Wall Tool Settings
Walls are parametric elements of the building that can have several different properties such as sizes, options, functions and compositions that define a wall type. Use the Wall tool settings window to define the parameters of the wall type.
_
Wall Family
You can select to create a standard-case (basic) wall or a composite wall.
Standard-case Walls
When you select standard-case walls, you can select its geometry as regular or irregular. Regular walls are defined by one thickness value and their shape in plan view is rectangular.
Irregular walls are defined by start and end thickness values.
Basic walls automatically join to other basic walls, regardless of thickness and fill, unless the joints are disabled in the Settings window.
Composite Walls
Composite walls consist of multiple layered components, each with its own properties. Composite walls can only be rectangular in shape, with constant thickness from start to end. The total thickness is calculated as the sum of all the internal components.
_
When you select the Composite Wall family in the Settings panel, the family-specific section shows a button to edit the internal components, the value of the total thickness calculated as the sum of the internal components, and the pen wight menu to define the pen to be used for the lines that separate the internal components.
- Composite walls can have any number of internal components, and you can add, remove, reorder and edit the components at any time through the Wall Components window.
- By default, basic walls and compound walls do not join automatically, because they are different elements that would not be joined in a real situation. Also, they are made of different materials which would not match. However, if a particular situation requires it, you can choose to activate the Allow Joints options and attempt to join two walls of different type.
_
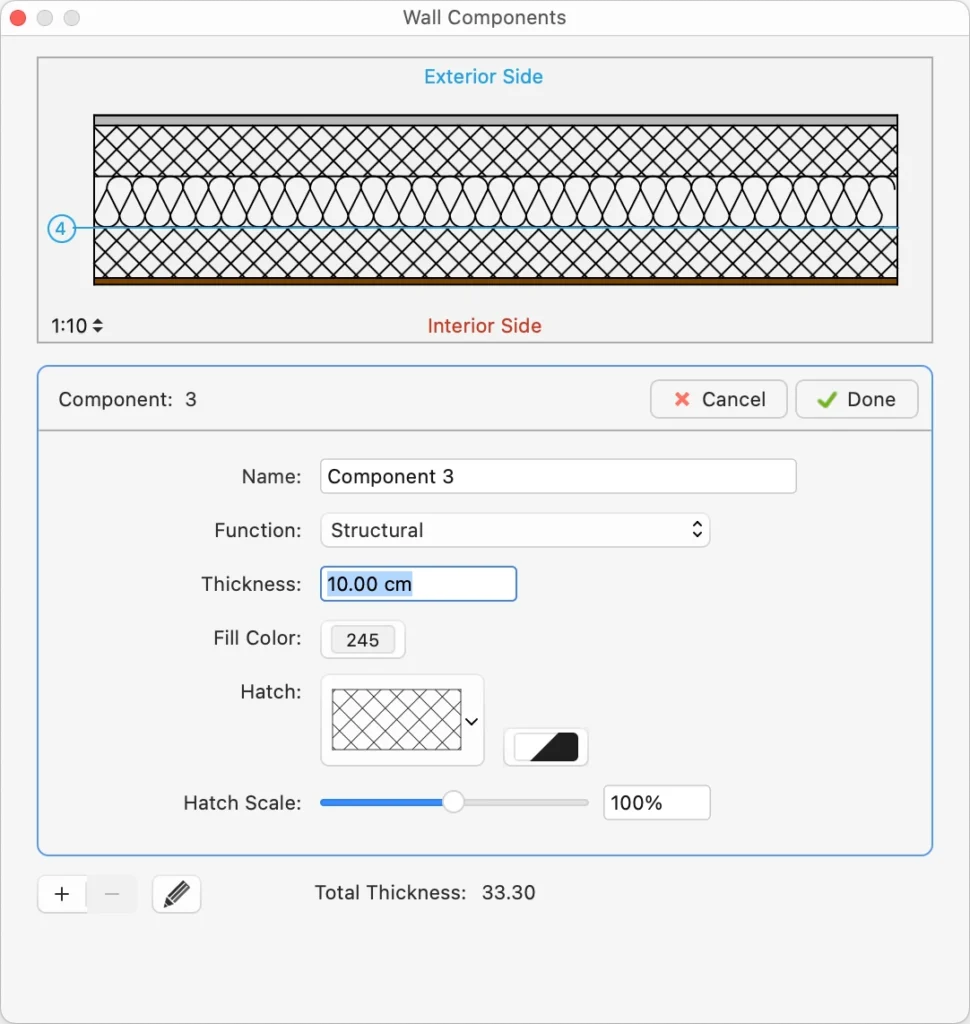
Editing Composite Wall Components
Press the Edit button on the Wall tool settings window to open the Wall Components panel. This panel allows you to define, reorder and edit the internal components of the current wall type.
_
The table lists the components of the wall from the exterior side to the interior, with a progressive index number. The selected component is highlighted in the preview, which shows the current wall at the scale. You can check how the wall is rendered at the different drawing scales by using the drawing scale menu on the preview area.
The total thickness of the wall is computed on the sum of the single components and shown at the bottom of the Thickness column.
You can add, remove and reorder the components, and rename a component by double-clicking its name. Use the + button to add a new component and the - button to remove the selected component in the table. Adding a new component opens immediately the properties editor. To edit a component, click the Edit icon on the right.
 _
_
Use Component panel to enter the component name, function, thickness and the hatch to be used in horizontal and vertical sections.
Click the Cancel ✖ or OK ✔ buttons to cancel or confirm the changes to a component and return to the list of components. You can also push the + button to confirm the current component and create a new one directly without going back to the components list.