Editing a Hatch
Hatch and fill regions can be edited by adding and removing vertices, stretching a vertex, or by fitting a segment to an arc. Most operations can be performed by clicking a vertex or a side of the shape, or by opening the Edit popup menu.
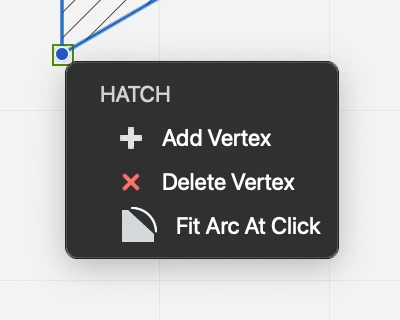
To Open the Edit Menu
With the hatch selected, move the pointer over a vertex and wait half a second until the Edit menu opens next to the vertex.
 _
_
Add and Remove Vertices
To add a vertex to a selected hatch
- Click on the border on any segment. The cursor changes to show that you are about to add a point.
- Alternatively, open the Edit popup menu over a vertex and choose Add Vertex.
To remove a vertex
- Open the Edit popup menu and choose Delete Vertex.
Fit Arc at Click
Hatch regions support only straight segments, but can be applied to arcs with a specific command available on the tool popup menu. To apply a hatch to an arc, do the following:
- Create the hatch by clicking the vertices of the outline. While defining the hatch boundary, do not follow the profile of the arc with the hatch points. Instead, add the chord of the arc between its start and end points.
- Select the hatch you just created, move the pointer over one of the points at the start or end point of the arc and hover for half a second. The options popup menu opens.
- Select Fit Arc at Click and click on the arc.