Edit Images
HighDesign lets you insert images into a project and treat them as any other vector object. The Edit Image tool (Tools menu) lets you edit and crop the image, enhance and adjust the values of brightness, contrast and saturation.
It often happens to have the need to adjust the brightness, contrast, levels of color of an image to be used for a photogrammetric projection or as a background for a drawing: HighDesign provides an integrated image editing module to quickly apply many image enhancements.
To edit an image, select it and choose Tools ▸ Adjust Image: a window opens with all the controls to edit the selected image.
 _
_
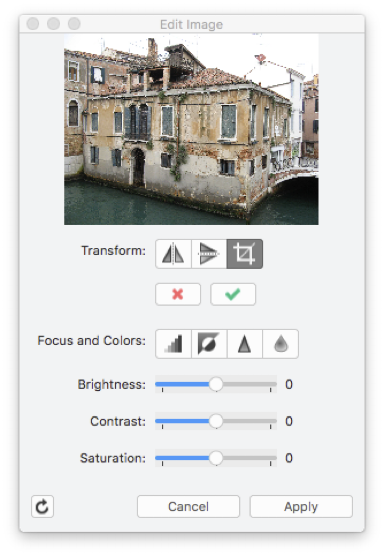
The Adjust Image dialog shows the preview of the image on the top. The controls are grouped as transformation buttons, advanced filters buttons and the sliders for brightness, contrast and saturation. The available options are:
- Transform:
- Mirror Horizontal, mirrors the image horizontally on its Y axis;
- Mirror Vertical, mirrors the image vertically on its X axis;
- Crop, trims the borders of the image leaving the selected area only;
To apply a filter, push the corresponding button or move the slider. Sharpen and blur filters can be applied multiple times. Any filter you apply, which you can preview in the thumbnail, is stored in a temporary image until you push the “Apply” button, which applies all filters in queue to the main image, while the “Cancel” button clears the filter queue.
The “Revert Image” button, on the lower left hand corner of the window, clears all applied filters from the image.