Subsections of Collaborate and Share
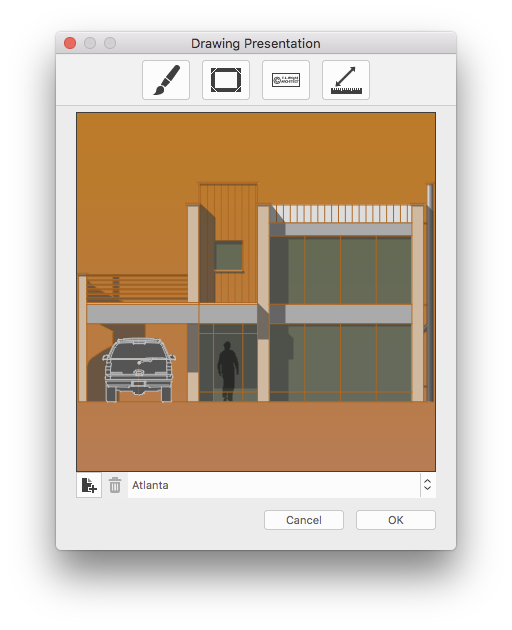
Drawing Presentation Tool
This is a 2D rendering tool that creates high-quality images of your project with varying effects of background, pen and fill colors, border and margins, watermark and adjustable size and resolution.
This tool not only applies anti-aliasing to object edges, but it also allows customizable print size and image resolution and provides background options, frames and color effects to make high impact presentations of your projects. The result is an image that can be exported into any of the supported graphic file formats. To set all options, select Tools ▸ Render to open the image settings dialog.
Set Image Options
Use this dialog to set the visual effects and options to create an illustration.
- Image effects: click to show the graphic options.
- Border: option to display a border, color and thickness of the margin.
- Watermark: options to add a digital signature or watermark to the image.
- Image size: options to set the image resolution and size.
- Preview of the resulting image.
- Buttons to save the current settings as a new theme or to delete the selected theme.
- List of loaded themes.
Once all the settings are done, if you wish to save the current settings as a new theme for future use, just push the “+” button close to the themes menu to see it listed on the menu with the desired name. Click “Ok” to confirm and open a new window displaying the resulting image or “Cancel” to dismiss this dialog.
 _
_
Image Effects
The options to apply graphic effects to the image include:
- Background:
- By Project: sets the background to the same color as used in the main project window;
- Plain Color: use the button to select the color;
- Horizontal Gradient: select left and right colors of the gradient;
- Vertical Gradient: select upper and lower colors of the gradient;
- Image, tiled: draws an image as background; pictures smaller than the destination image are tiled; select the image from disk;
- Image, resized: draws an image as background scaling it to fit the destination image. Images are scaled non-proportionally; select the image from disk.
Watermark
The Watermark feature of the “Render” tool allows you to add a text watermark to the image: the text style options include Font, size, text style (bold, italic, underline) and color. Through a menu it is possible to set the position of the watermark within the image.
Image Size options
In this pane are grouped all the options to set the desired format, size and resolution of the resulting image.
- Preset: choose the size that best fits your needs from the many standard formats in the menu;
- Pixel Size: use the fields to enter your custom image size in pixels: click the icon to lock the desired ratio;
- Resolution: set a resolution of 72 dpi for Web publishing or presentations, whereas 300 dpi or higher resolutions are best for print output;
- Print Size: you can set width and height of the printout, using the menu on the right to set the units.
Export Images
The resulting image is displayed on a new window which provides some buttons, including the zoom buttons: press the “Save” button to export the image as a TIFF, PNG or JPEG file or the “Copy” button to copy the image to the clipboard.
You can also drag and drop the image on the main project window to insert it in the current sheet.
Printing
Subsections of Printing
About Printing in HighDesign
The print function produces high quality prints on any page format supported by your printer or by the current print driver in your system.
The basic concept behind printing in HighDesign is “what you see is what you get”, meaning that not only the printed page will look as much as possible as the drawing on screen, but also that no scaling, hiding or other operations are required in order to print the drawing. If the project includes sheets at different scales, they will be printed with the same relative proportions.
All print operations are performed by selecting one of the print items in the File menu.
- Page Setup: opens the standard page setup dialog of your Operating System. Use this dialog to select the printer and set page size and orientation.
- Print: opens a dialog to set HighDesign specific print settings and get information about actual drawing extents and number of pages that will be printed.
Some items of the project are not printable: Detail Area frames and Selection handles. These are objects that are only meaningful on the screen.
Construction objects such as datum points, grid, and construction lines can be printed if the “Print Construction Objects” checkbox in the Print dialog is active.
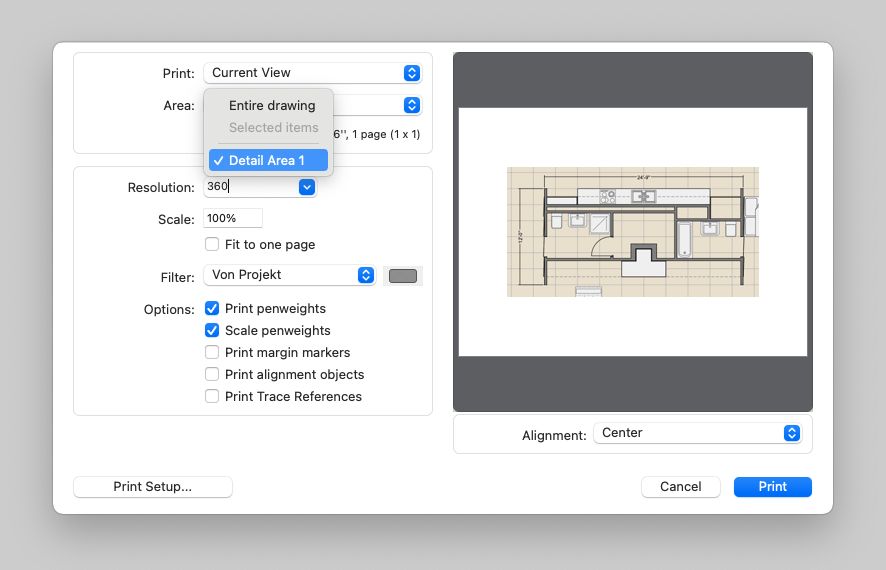
Print Detail Areas
The Area menu of the Print window allows the printing of the whole drawing or just the selection of specific parts of the project, selected items or Detail Areas.
 _
_
The Detail Areas of the project are listed and are available for printing: just select the one you wish to print. The preview will show the updated page layout with the current Detail Area in place of the whole drawing.
Push the Print button to print the selected Detail Area with the current settings and Print Setup.
The Print Preview Window
This window contains the Project View pop-up menu, to choose the view you want to be printed with its corresponding set of visible sheets and layers (Pro-only feature), the Layout pop-up menu, used to set the position of the printed drawing relative to the pages, and the Printable Area pop-up menu, providing a list of possible print options. Available options are:
- Whole drawing: prints all items on visible sheets and layers;
- Selected items: only prints currently selected items;
- Detail Areas: from a list of available Detail Areas, this options only prints the region of drawing included within the bounds of the selected area.
The Print button opens your printer’s Print Settings dialog. This dialog may include different panes for each printer manufacturer.

- Print. Use this menu to select the current view, a saved project View to automatically show and hide sheets and layers accordingly, or a Layout.
- Area. Options of this menu are: Whole Drawing, to print all the visible objects in the drawing; Selected Items, to print only the objects currently selected; any available detail areas created with the Detail Area tool.
- Actual extents of the drawing being printed and number of pages required to print the drawing (rows x columns).
- The alignment menu lists the options to position the drawing within the page.
- The preview of the printed page.
- Resolution menu. Set the print resolution from 180 to 1200 dpi (600 dpi is the default). This value only sets the maximum resolution, but the actual resolution at which the drawing is printed depends on the current printer.
- Scale field to set custom reduction/enlargement factors. The checkbox Fit To One Page calculates the best scaling factor to print the entire drawing on one page.
- **Filter **menu. Lists the options to print by project color settings and to print all colors as monochromatic through the colors menu. Sub-options are the ability to exclude fill colors and to disable the color interpolation of stroke lines. This last option allows to print the drawing with a fixed color regardless of the brightness of the original color in the drawing.
- Options:
- Print pen-weights option: uncheck to print everything as thin lines.
- Scale Pen-weights. When “Fit to one page” is set, the Scale pen weights option allows you to choose whether the pen weights should be scaled to match the new zoom factor of the printout.
- Print margins: if checked, small marks are printed at the corners of the available printable area on each page.
- Print construction objects: if selected, construction points and lines of the selected view will be printed.
- Print trace references (Pro): when enabled, trace references are included in the overall bounds of the drawing and printed.
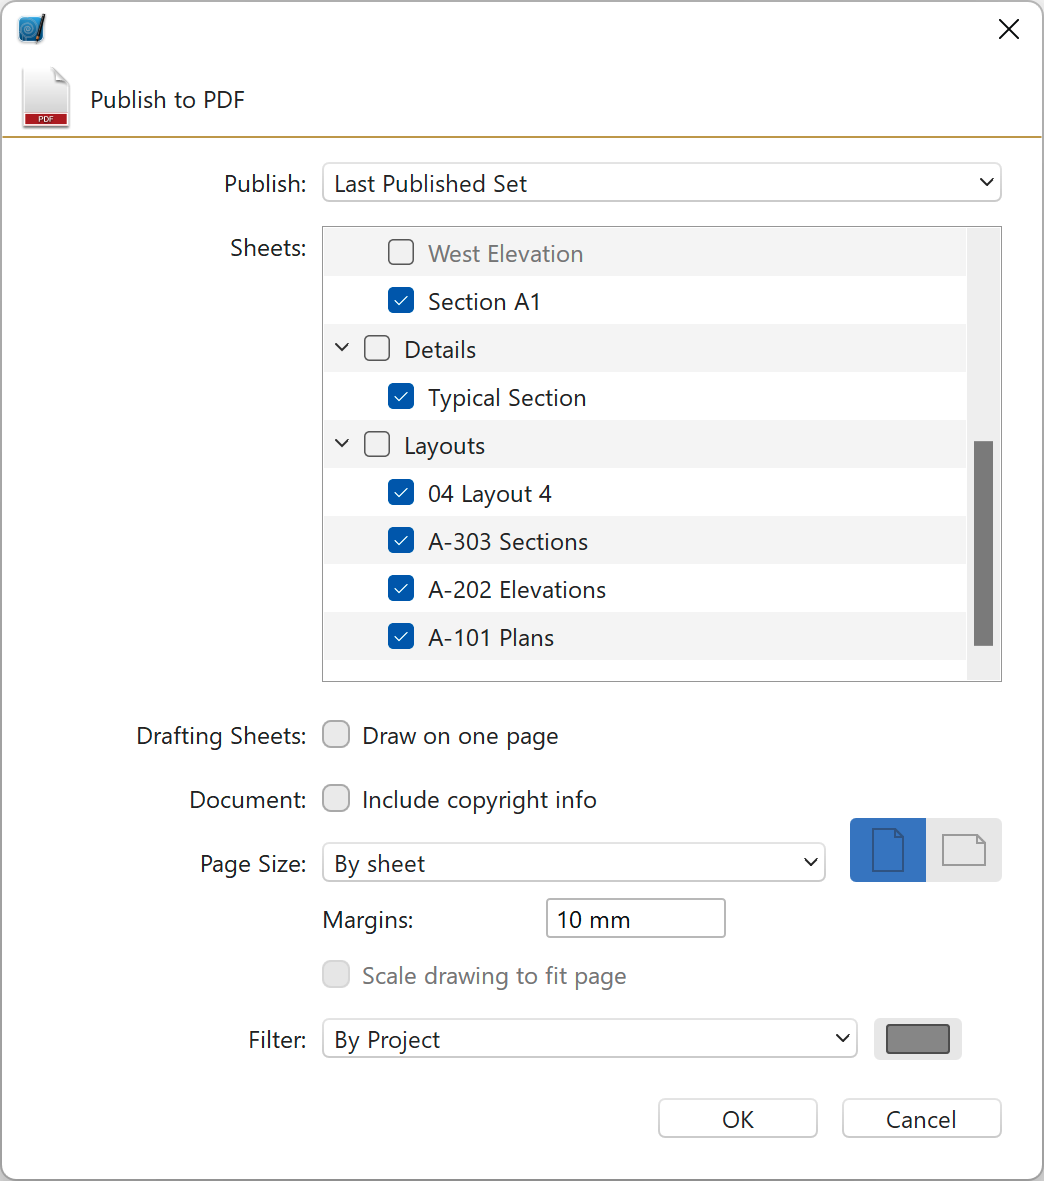
Publish to PDF
With this function available on the File menu it is possible to create single page or multiple pages vector PDF documents which can be edited with other applications and printed with large format printers and plotters.
 _
_
The options available in the Publish to PDF window are:
- Check the Include Construction objects option if you want the PDF to include points and construction lines.
- Document pages: “Single Page” creates a one-page PDF document; “Multiple Pages” creates as many pages as the visible sheets.
- Include copyright info: this option adds information about the project from the Info pane of the Project Settings window.
- Publish menu brings the following options:
- Current View to export the project as it is currently visible on screen;
- Custom to select the desired sheets to export;
- All Layouts to create a multiple page PDF document with all the layouts of the project;
- List of the available Project Views to export the selected one.
- List of all Sheets, Details and Layouts of the current project: select the sheets to include in the PDF document for custom publishing.
- Page Size menu. Available options are:
- Fit Drawing Extents: page sizes are calculated on the extents of the drawings.
- Available Sheet Size: this sub-menu lists the sheet sizes of project if already set; all sheets get the size from the selected one.
- ISO, ANSI, US ARCH standard sizes sub-menu.
- Orientation of the selected page.
- Option to scale the drawing to fit the selected page.
- Option to apply graphic filters to the PDF.
Working with DXF:DWG Drawings
Subsections of Working with DXF:DWG Drawings
Export a DXF/DWG Drawing
To export a drawing as DWG or DXF, select File ▸ Export ▸ DWG or DXF. A dialog allows you to define the parameters for the conversion.
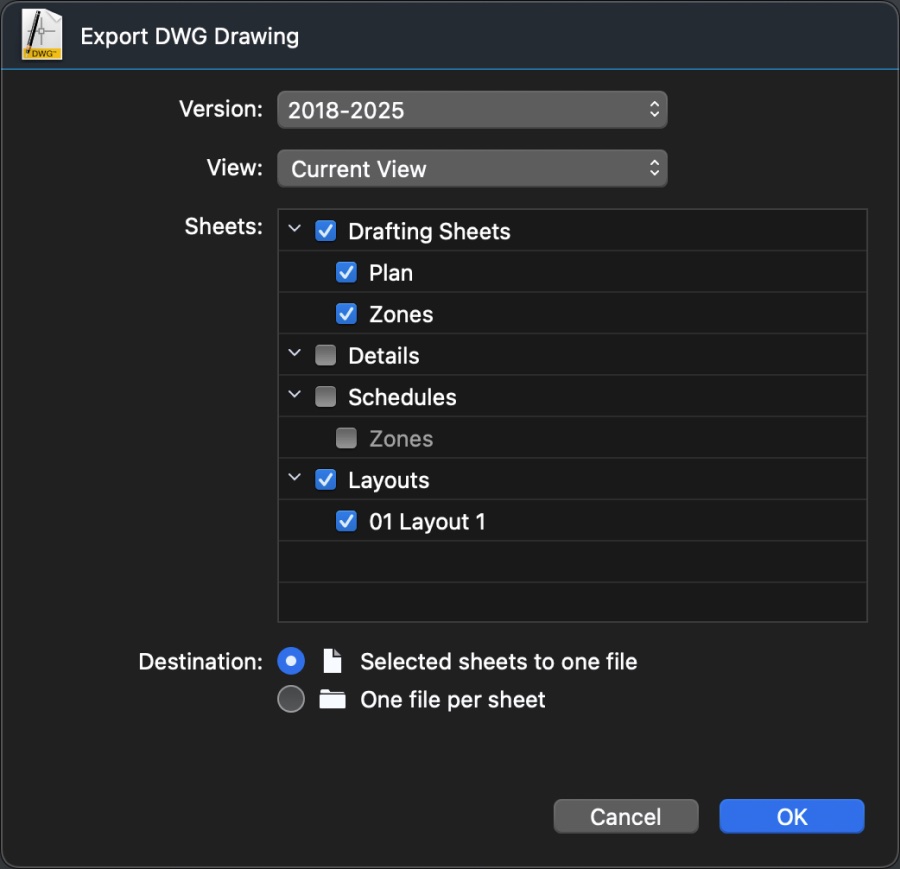
The Export as DWG/DXF dialog
- Format version via a pop-up menu. This menu lists all the supported DWG/DXF versions from R12 to the latest 2018-2025.
- View: open this menu to select a view to export. The available options are:
- Current view: exports the drawing that is currently actve and visible on screen.
- All Sheets: exports all the sheets in the project.
- All visible sheets: exports only the sheets that are visible.
- Custom set: use the table to select what items you want to export.
- Project Views: if the project contains named views, you can select one from the list.
- Sheets table: a list of the sheets in the projece. You can select Drafting Sheets, Details, Schedules and Layouts;
- Destination: you can choose the export the drawings as one file or as separate files.
- Option to export all selected sheets as a single DWG/DXF document;
- Option to export each selected sheet as a separate document (all documents are collected in one folder).
Important
CAD programs that use DWG/DXF as their native file format have a different system of arranging drawings and layouts compared to BIM-oriented programs like HighDesign. In those kinds of software, the project is usually contained in one virtual space called Model, scaled at 1:1. The various drawings are usually placed one next to the other, tiled on an infinite drawing board.
HighDesign on the other hand uses sheets to organize the project, which means that each drawing as its own, independent space. When exported as DWG/DXF, a HighDesign project may show some drawings overlapped in the Model space.
To avoid that, you may want place your drawings so that they do not overlap, by using the sheet’s visibility options, or you can export each drawing to a separate file by selecting the “One file per sheet” option.
Tip
For best conversion to DWG/DXF, set the drawing units of your drawing to either decimal inches or millimeters.
Import a DXF/DWG Drawing
Select File ▸ Import ▸ Single DXF/DWG file. Before opening a DXF/DWG file a dialog lets you set the basic import settings:
- Drawing units to be used to convert DXF/DWG elements; most DXF/DWG versions do not include a measurement unit;
- Destination scale of the drawing;
- When the “Use file drawings units” option is active, HighDesign tries to set the drawing units as found in the file. If no drawing unit is found this option has no effect;
- Options to set the background color to black or to add a prefix to layers;
HighDesign SE and Pro import DWG/DXF documents with both Layouts and Model data: when opening the document, the drawing, or Model, is located on the sheet named “Model”. In HighDesign SE, layout sheets are imported as drafting sheets with a defined paper format; in HighDesign Pro, the Layout objects are imported into layout sheets.
HighDesign LT only imports the Model space. Layouts are ignored.
Insert a DWG/DXF drawing (SE & Pro)
In HighDesign SE and Pro, use the Project ▸ Insert ▸ DWG/DXF drawing menu item to insert a DWG/DXF drawing into the current project without creating a new document. This command will add a new drafting sheet with the Model space from the specified drawing.
Extend the default Symbol Library
It is possible to extend your Symbols library by creating new custom symbols or by adding external libraries: the “Add Symbol Library” command on the File menu lets you select a folder of HighDesign symbols and copy them to the desired folder in the User Library folder.
Import and Extract Blocks
Use the “Import DWG/DXF Blocks” tool to convert a folder of DXF/DWG blocks or drawings to HighDesign-native symbols. Converting a symbol library is a two-step process, all performed in a single window.
Choose File ▸ Import ▸ Import DWG/DXF Blocks…; the following window opens:
- Conversion options - convert blocks/drawings within one folder or blocks within one DWG/DXF file. Push the Choose button
- When the import process is complete, you can use the table to review and edit the imported symbols.
- Preview of the symbol.
- Click the Convert button to save the HighDesign symbols into your current Library folder.
The list of symbols can be reordered by dragging the rows.
The first step consists of selecting the folder on your disk and importing all the readable drawings contained in it. Supported formats are all DXF versions from R10 to 2020 and all DWG versions from R9 to 2020.
Push the Import button to choose the folder. If the selected folder contains readable files, the standard DXF/DWG Import dialog opens allowing you to set the scale and drawing unit options.
With the second step you can set the options and complete the conversion to HighDesign symbols. The table displays name, scale, width, height and the preview of each symbol, letting you modify the attributes of the symbol before it is saved.
Working with Images
Subsections of Working with Images
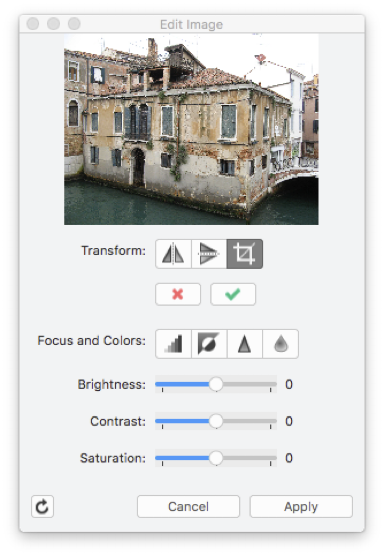
Edit Images
HighDesign lets you insert images into a project and treat them as any other vector object. The Edit Image tool (Tools menu) lets you edit and crop the image, enhance and adjust the values of brightness, contrast and saturation.
It often happens to have the need to adjust the brightness, contrast, levels of color of an image to be used for a photogrammetric projection or as a background for a drawing: HighDesign provides an integrated image editing module to quickly apply many image enhancements.
To edit an image, select it and choose Tools ▸ Adjust Image: a window opens with all the controls to edit the selected image.
 _
_
The Adjust Image dialog shows the preview of the image on the top. The controls are grouped as transformation buttons, advanced filters buttons and the sliders for brightness, contrast and saturation. The available options are:
- Transform:
- Mirror Horizontal, mirrors the image horizontally on its Y axis;
- Mirror Vertical, mirrors the image vertically on its X axis;
- Crop, trims the borders of the image leaving the selected area only;
To apply a filter, push the corresponding button or move the slider. Sharpen and blur filters can be applied multiple times. Any filter you apply, which you can preview in the thumbnail, is stored in a temporary image until you push the “Apply” button, which applies all filters in queue to the main image, while the “Cancel” button clears the filter queue.
The “Revert Image” button, on the lower left hand corner of the window, clears all applied filters from the image.
Insert an Image
HighDesign lets you easily add pictures to your project from several graphic formats (TIFF, JPEG, PNG, GIF, PDF). Images inserted into the project keep their resolution and are displayed at the real print size: it is also possible to handle them as any other vector entity. PNG and TIFF images are imported with their alpha channel if present.
To insert a picture in your project, select File ▸ Insert Image… or Project ▸ Insert ▸ Image, choose the image and place it at the desired position with a click. Alternatively, you can drag an image from another application, such as a web browser, drag a file directly onto the drawing canvas, or use the Paste command to paste an image from the clipboard.
PDF documents can be inserted as high-resolution images. When you choose a PDF document with the Insert Image command, you are presented with a dialog where in you can select the page to import, if more than one, and set the resolution at which the image object will be created.
If you use the Pro version of HighDesign, you can also enhance the image by adjusting brightness, contrast, saturation, size, sharpness, smoothing factor, etc. To set size on screen, print size, resolution and transparency of images, use the Image Settings window on the Edit menu.