Subsections of Quick Start Guide
Install Guide for HighDesign
HighDesign Trial Version
When you download HighDesign from the Ilexsoft website, the software launches as a time-limited trial version.
The limitations of the Trial version are:
- Operative for 30 days of use;
- Printed pages and exported images have a “HighDesign Trial” watermark;
HighDesign Trial lets you explore all the available features, including those of the Pro version such as walls, sheets, views, photogrammetry, etc.. At the end of the trial period, the application will no longer launch.
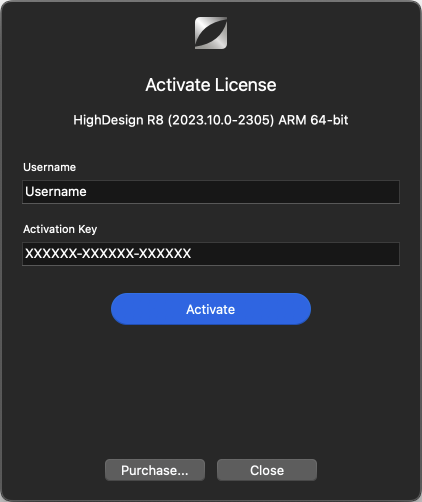
When you purchase a license, launch HighDesign and insert your Username and License Key into the License dialog. There is no need to download a separate package.
Install on Mac
The download version is a compressed Disk Image file (.dmg). Depending on your Internet preferences, the file could have already been expanded after the download.
1. Once the file has been expanded, you should see on your Desktop (or your default download location) the “HighDesign” dmg file. Double-click it to mount the drive.
_
2. To install HighDesign, drag the icon to a folder on your local or network disk. There is no required location; however, if you have multiple users on your computer, put it in the main Applications folder to make it accessible to all of them. Note that you will be required to log in as an administrator to write to the Applications folder.
_
Activate HighDesign
- Launch HighDesign Trial.
- Click the Activate button on the launch window. Alternatively, go to HighDesign > Activate License…
- Enter Username and activation key exactly as they appear in the HighDesign Activation email sent from Ilexsoft.
 _
_
To remove the license, go to HighDesign menu > About HighDesign and click on the License button: select the license in the table, click the Delete button and confirm.Edit
Uninstall on Mac
To uninstall HighDesign on a Mac, follow these steps:
- Quit HighDesign.
- In the Finder, go to Applications (or the folder where HighDesign was installed), locate the HighDesign icon and move it to the Bin.
Please note that this action will not delete the HighDesign Support folder. The HighDesign Support folder contains all the preferences and custom libraries, which you might want to keep for the next installation. If you want to completely remove the HighDesign Support folder, do the following:
- In the Finder, open the Go menu and press the Option (Alt) key.
- Choose Library and navigate to Application Support/ILEXSOFT. We advise to always make a backup copy of the HighDesign Support folder before continuing.
- Locate the folder you want to delete and move it to the bin.
Install on Windows
After downloading the file, follow these steps to install HighDesign:
- Log in to the computer with a user account that has administrator rights;
- Double-click the EXE install file. You can also context-click and select Run As an Administrator;
- Click Next in the Welcome dialog box;
- Click on the “I accept the terms of this license agreement” button in the End User License Agreement if you agree to the terms;
- Click the Next button to install HighDesign in the default location;
- Click the Install button if you’re satisfied with the settings;
- Click the Finish button when prompted;
Uninstall on Windows
To uninstall HighDesign, go to the Start menu (the windows logo) and follow the path below:
Select Settings > Apps > Apps & Features > HighDesign; Click the “Uninstall” button.
Key HighDesign concepts
HighDesign is a design and documentation tool for architects and design professionals who work in the architecture-engineering-construction (AEC) industry. With a modern, intuitive interface and powerful drafting and design functions, HighDesign uniquely combines traditional computer-aided-design (CAD) features with advanced parametric and information tools.
The wide range of drafting, design and documentation functions and the features of project organization allow the rapid production of concepts, drafts and designs.
In HighDesign, a project is a set of drawings, views, annotations, layouts, images and information that thoroughly represent your design. HighDesign assists you in the design work from the conceptual to the design and production phases.
Available on the main toolbox, these tools let you create content for your project and are grouped by function. There are four main function groups:
- SelectionThese tools let you accurately select the objects in your drawing.
- Drawing toolsThis group includes tools for the insertion of lines, rectangles, arcs and other geometric shapes.
- Documentation toolAll the tools you need to document your project: texts, leaders, annotations and tags, dimensions.
- Design toolsThese tools let you insert parametric elements of a building: walls, columns and pillars, doors and windows.
Objects and Elements
Each item of the project has its hierarchy which allows to easily structure and organize the different parts of the drawings. Therefore we have generic and specific objects of the project.
The hierarchy of the items of the project classifies them as:
- ObjectsAny item of the project. It can be a line, a text, a wall, an image a title block, etc.
- Graphic Objects2D drafting objects and shapes such as lines, polygons, circles, curves.
- ElementsGraphic objects with advanced settings (hatches, symbols, texts, annotations, dimensions).
- Building Elements Parametric components of the building such as walls, columns, doors, windows.
Objects, Graphic Objects, Elements and Building Elements are organized in Classes, usually corresponding to the tool options used to draw them: Line, Arc, Wall, Door are different classes of objects.
Classes of objects can have sub-categories called Families: e.g. swinging door and sliding door are different families of the door class.
The objects of the project can have abstract definitions of their parameters: Basic Styles, Graphic Styles (for the elements of the project) and Building Element Types (for the building elements).
For more detailed information about objects in HighDesign, see the document Object Hierarchy in HighDesign.
Parameters
With the exclusion of the most basic objects, such as points, lines and polygons, most objects in HighDesign are parametric. Parameters define the size, shape, position and the other attributes about an element in the project. A parametric object is complex entity that changes according to its internal values as well as its relation to other objects.
This is one of the key features that sets apart HighDesign from traditional computer-aided systems: a wall in HighDesign is not a group of lines, but an element that represents a real-world element, much like BIM systems. Here are some examples:
- A dimension line is one object made of the witness line, extension lines, markers and a label. Each item can be defined via parameters that change the final appearance of the dimension.
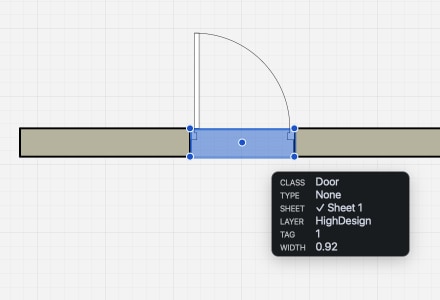
- The graphical representation of a door comes from its parameters such as frame size, thickness, opening direction, etc. Its position and the other attributes also change according to the host wall where the door is inserted.
- Doors and windows change their level of detail according to the drawing scale of their sheet.
- A wall, in addition to being defined by its parameters, also reacts to its context: it can automatically connect to other walls if they are compatible by family, and, if moved, its doors and windows also move with it.
The HighDesign User Interface
Get to know the elements of the HighDesign user interface.
Home Window
The Home window opens by default when you launch HighDesign and presents the options to create or open projects, choose a template, and contains links to useful resources. It is organized in several sections that can be accessed through the sidebar on the left. From top to down:
_
- New: creates a new, empty project.
- Open: opens the default Open File dialog to open a HighDesign (.DSN) file or AutoCAD drawing (.DXF, .DWG).
- Recent projects: browse a list of recently-opened projects. Only .DSN projects are listed. Select a file and click the Open button or double-click to open it.
- Templates (Pro): this section contains the built-in and user templates.
- Examples: open an example to explore the features and the possibilities of HighDesign.
- What’s New: shows a summary of the new features in the current version.
- Recovered: this section lists any auto-saved files that may be detected when the application launches. If you need to open a recovered file, select it from the list and press the Open button. Important: note that auto-saved files are not retained after the application quits, so any recovered file that is not opened and saved when detected will be lost.You can access the Recovered section at any time during the session.
- Settings: opens the Application Settings window.
- Guided Tour: starts a tour of the user interface of the main Project window.
- Quick Start Guide: opens the web page of the HighDesign Quick Start.
Project Window
_
- The Drawing Area in the middle of the project window displays the project views.
- The toolbars provide essential functions, such as the drawing tools and methods, the input fields and commands, the edit functions, and the properties controls. Through these commands, arranged in logical areas, all the drawing functions are easily accessible.
- The Sidebar provides functions that are mainly used to organize the project and manage project elements: the Project Browser and the Views panels, Object Info and Graphic Attributes, and the Project Styles panels.
- The Menu bar on the top of the project window displays the menus listing almost all of the program functions, commands and features.
The icons in the toolbox can be arranged on one or two columns by clicking the resize icon on the bottom side of the toolbox.
_
Use the tools on the toolbox to draw lines, circles, shapes, insert texts, dimensions, pictures, etc. A tool can have multiple methods, each with its own sequence of steps and inputs required to construct a specific object.
For example the Arcs and Ovals tool includes the methods to create circular arcs by center and radius, by diameter, by two points and radius, by three points by tangents; ellipses by radii, by box and quarter of ellipse.
- Click on any button to activate the tool.
- Click the arrow to open the pop-up list of the tool methods.
_
Some tool icons show three dots in the bottom-right corner: that means that the tool offers more advanced properties needed to construct the object. This is typically used for more complex objects like symbols, hatches, texts or dimensions.
- Double-click the tool to open its Tool Settings window.
_
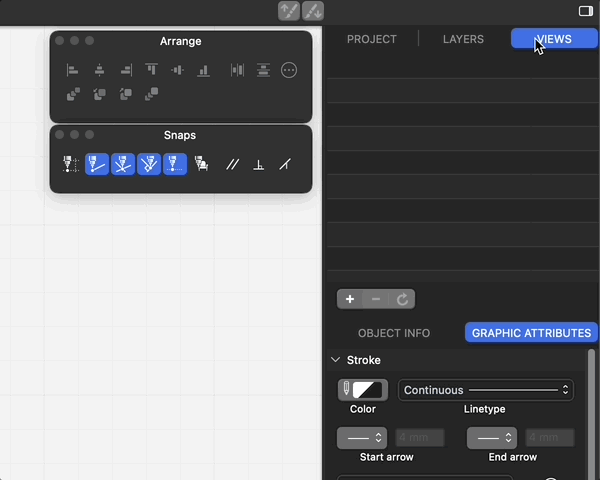
In HighDesign Pro, you can also right-click a tool icon to open the Styles panel. This panel shows the available styles or types for the clicked tool.
- Right-click (or ctrl-click) a tool icon to open the Styles panel and select a style.
Right-click a tool to select a style_
The Properties Bar
_
The Properties bar is divided into two areas:
- The first area shows the methods of the current tool, expanded to show all the icons on one row when there is enough space, or compressed to a single icon and drop-down menu.
- Some methods require additional parameters, like the number of sides of a polygon or the leading side of a wall. The option control is visible after the method icons.
_
- The second area shows the most common properties: layer, pen color, fill, line type, start and end markers, pen size, and the settings button that opens the Tool Settings window for the current tool when available. If one or more objects are currently selected, changing a property modifies all the selected objects. If there is no selection, the Properties bar shows and modifies the current default properties that are applied to new objects.
Each button opens its own menu or panel, with options and commands specific for that property.
The Main Toolbar
_
The Main Toolbar shows the most commonly used editing tools. It is divided into three groups: Affine Transformations, Line editing, Shape Modifications.Only some of the editing tools are shown in the editing bar. Other more specialized tools can be found on the Tools menu.
- Click an icon to activate the tool. If the icon is disabled, you need to select one or more objects first. Click again to cancel.
- By default, the step-by-step instructions to use the tool are visible on the status bar, at the bottom of the window.
- Some tools, like Multiply or Rotate by Angle, open a floating panel that allows the definition of some parameters. These windows stay open while the tool is active and can be accessed at any time during the steps of the editing operation.
The lower part of the main window hosts the group of toolbars that allow you to control snaps and drawing constraints, set the current drawing scale and units, enter coordinates and values, and change the zoom factor and other view options.
_
While you can control those options from other panels and menus elsewhere, these buttons are always available here for easy access and review.
The side of the main window contains the Sidebar where the utility panels are easily accessible and organized in groups. The sidebar fills the side of the drawing area and can be resized to show more content.
 _
_
The sidebar can be minimized to a vertical tab bar, so it does not take up screen space when the panes are not in use. Click a tab to open the panel as a pop-up window and click outside to close it.
You can also open and close panels from the Window > Panels menu.
The panels provide access to the most used features: navigating among the items of the project, activating and deactivating layers, storing and activating project views, view and edit the geometric and graphics properties of the selection.
Typically, a panel does not replicate the full features that are available for its function, so as to keep its use quick and straightforward. Those feature that provide more advanced options, like layers or styles, a button opens the feature manager where you can make further adjustments and customizations.
Basic Tasks
Create and Set Up a New Project
When you launch HighDesign, it automatically creates a blank project with settings based on the last project that was saved, or on the defaults if it is the first launch. You can then customize this project to your needs and set units, create sheets, layers, add palettes; alternatively, in HighDesign Pro you can open a template and start from there.
Use the Preferences window (HighDesign > Preferences on macOS, Edit > Options on Windows) to set the options that best suit your workflow and habits and are most likely to stay the same for each new project. In the Preferences window you can set the language, the file safety options to create and archive backup copies, the theme of the user interface, default drawing settings, etc.
Organize Your Project
When you start a new project, you typically want to prepare it for the kind of objects that it will represent: drawing scales, units, sheets, layers can be prepared in advance by using the Project Settings window (Project > Project Settings) and the Resource Manager window (Project > Resource Manager).
Essential Drawing Skills
To construct a new object, activate its icon from the toolbox, select the appropriate method and begin the construction on the main drawing area. By default, the step-by-step instructions appear on the Status bar.
To select an object:
- With the Arrow tool:
- click it once, or
- hold Shift and click to add it to or remove it from the selection,
- or define a rectangular or polygonal region to select the items enclosed.
When two or more objects are overlapped, activate the Arrow tool and right click on them. The contextual menu lists all the objects at the click location in reverse order.
To edit an object:
- Use the Arrow tool to change the basic geometry of the object, i.e. its bounding box.
- For more object-specific editing, for example adjusting the tangents of a curve or moving the origin of a hatch, activate its tool and click the handle or part of the object that you want to modify.
- To edit the coordinates, size and other options of the object, use the Object Info panel.
To enter a coordinate:
To enter a length:
To enter a length:
- While drawing, enter a numeric value. The keys pressed will be interpreted as a linear value for the current operation. If entered while drawing an item, the value will be used as the length of the item; if no drawing operation was active, the value will be interpreted as initial distance from a reference point defined by the next click.
Object Hierarchy in HighDesign
The items that make up a HighDesign project are organized in a hierarchical structure that streamlines the design process and makes it easier for the designer to manage the complexity of a typical design project.
Everything in HighDesign is an object. Objects can be graphical, i.e. lines, shapes, and any item that has spatial coordinates and a geometric representation; objects can also be non graphical, such as definitions or information associated to the object. For example, the client name and address, or the coordinates of the building area, and so on.
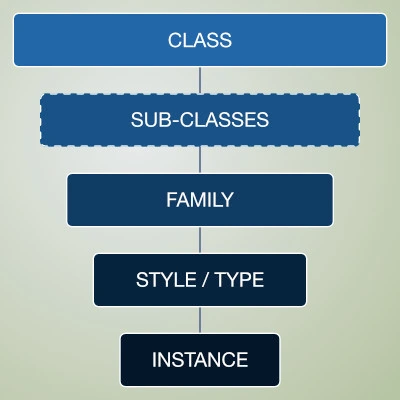
Every object belongs to a class which defines its intrinsic attributes and behaviors: Line, Rectangle, Symbol, Wall, etc. Between the class and the specific object instance inserted into a sheet, there can be several other levels of definition, as illustrated in the image below.
 _
_