Editing Images
Images can be edited graphically or by their parameters.
To edit an image graphically:
- Select the image, then
- Click the center handle to move the image
- Click one of the corner handles to resize the image.
- Click one of the middle handles on the sides to resize the image in that direction.
As you resize an image, its horizontal and vertical resolution values change to reflect the new pixel/display size ratio.
To restore the original image size and resolution, open the Image tool settings window and push the Restore Original Values button.
To edit an image by its parameters:
- Select the image, then
- Open the image tool settings panel and change width, height and resolution.
- Alternatively, use the Object Info panel to resize and rotate the picture.
Use the Image settings window to select new images to insert, and set the default size, resolution, transparency and storage format of image objects.
The Image tool settings window contains a preview of the image and several sections that show the current values and parameters.
_
Preview and Image Info
This area allows you to choose an image to insert or replace, and shows a preview of the image at the current transparency.
When no image is currently selected, the Preview area shows an Open Image button. Press that button to open a pop-up dialog from which you can select one of the images already inserted in the project, a recently-opened image, or choose an image file from your computer.
_
When an image object is selected in the drawing, you can replace the image by pressing the Replace Image button that appears when you move the pointer over the preview. Replaced images preserve size, resolution and transparency of the previous image.
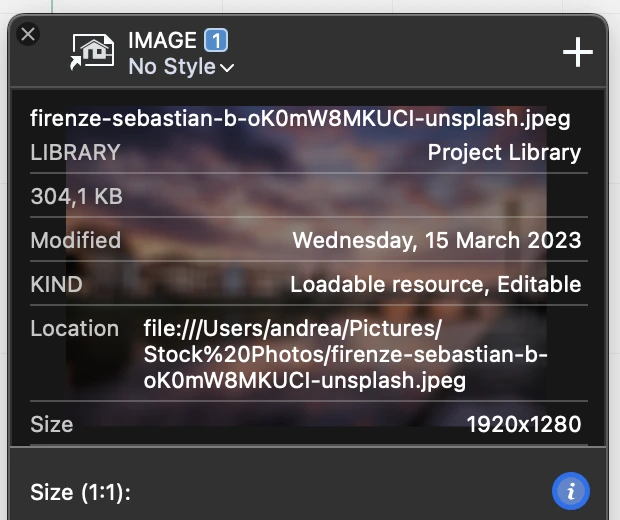
Press the Info button to view details and information about the image and its original file. The information include the location of the image file, its file size and modification date, and its bitmap size in pixels.
 _
_
Size and Resolution
Use the width, height and resolution fields to resize the image. To constrain a proportional resizing, press the constrain proportions button, and open the units pop-up menu to select the preferred units.
Images can be displayed at their print resolution or at screen resolution. Use the Display at screen resolution switch to change this parameter. The visible size of the image is larger at lower resolutions.
To restore the original dimensions of the selected image after it has been resized, push the Restore Original Values button.
Transparency
Images can be displayed at variable transparency, ranging from 0% (fully visible) to 100% (fully transparent). This setting does not modify the image and can be adjusted at any time.
Images are handled like other vector objects and saved in the project file. The internal format can either be PNG, which preserves the full quality of the image, or JPEG, which compresses the image and saves file size considerably, but reduces the quality. JPG is very good for photographic images, but not for images that contain line drawings, such as city maps or scanned drawings.
Insert an Image
HighDesign lets you easily add pictures to your project from several graphic formats (TIFF, JPEG, PNG, GIF, BMP, TGA, WebP, PDF). Images inserted into the project keep their resolution and are displayed at the real print size: it is possible to handle them as any other vector entity. PNG, TIFF and WebP images are imported with their alpha channel if present.
You can insert a picture in your project in several ways:
- File ▸ Insert Image…
- Project ▸ Insert ▸ Image…
- Double click the Image tool icon to open the Settings pane, push the Open Image button and the Open button on the pop-up panel.
- Drag and drop an image file from the computer onto the drawing area.
- Drag and drop a picture from another application, such as a web browser or a photo archiving software.
- Paste a picture from the system clipboard.
Images are inserted by their lower-left corner.
PDF documents can be inserted as high-resolution images. When you choose a PDF document with the Insert Image command, you are presented with a dialog where in you can select the page to import, if more than one, and set the resolution at which the image object will be created.