Subsections of Schedules
About Schedules
A schedule is a list that displays information about the elements in a project, extracted in real time and organized according to the specified parameters. For example, a schedule can list all the doors in a project organized by type and show their quantities, or list the walls on a specific layer along with their total length, surface and volume.
Schedules in HighDesign are interactive: each row in the table corresponds to an actual object in the project. Changes to that object are reflected in the schedule, and, where the parameter allows it, you can actually edit the listed item on the schedule and see the changes applied to the object in real time.
You can control the information shown in the schedule via its Settings panel, where you choose to list specific sheets or the entire project, define which category to list, apply filters, select the fields and define grouping and sorting rules.
Schedules can be formatted mostly like a table. You can change title, headers and data formatting, colors, sizes, and apply a predefined style.
Topics in this section
- Create a schedule
- Applying filters
- Sorting and Grouping
- Show totals, sums, averages, and count
- The Schedule sheet
- The Schedule table
- Formatting a schedule
- Export the schedule
Apply Filters
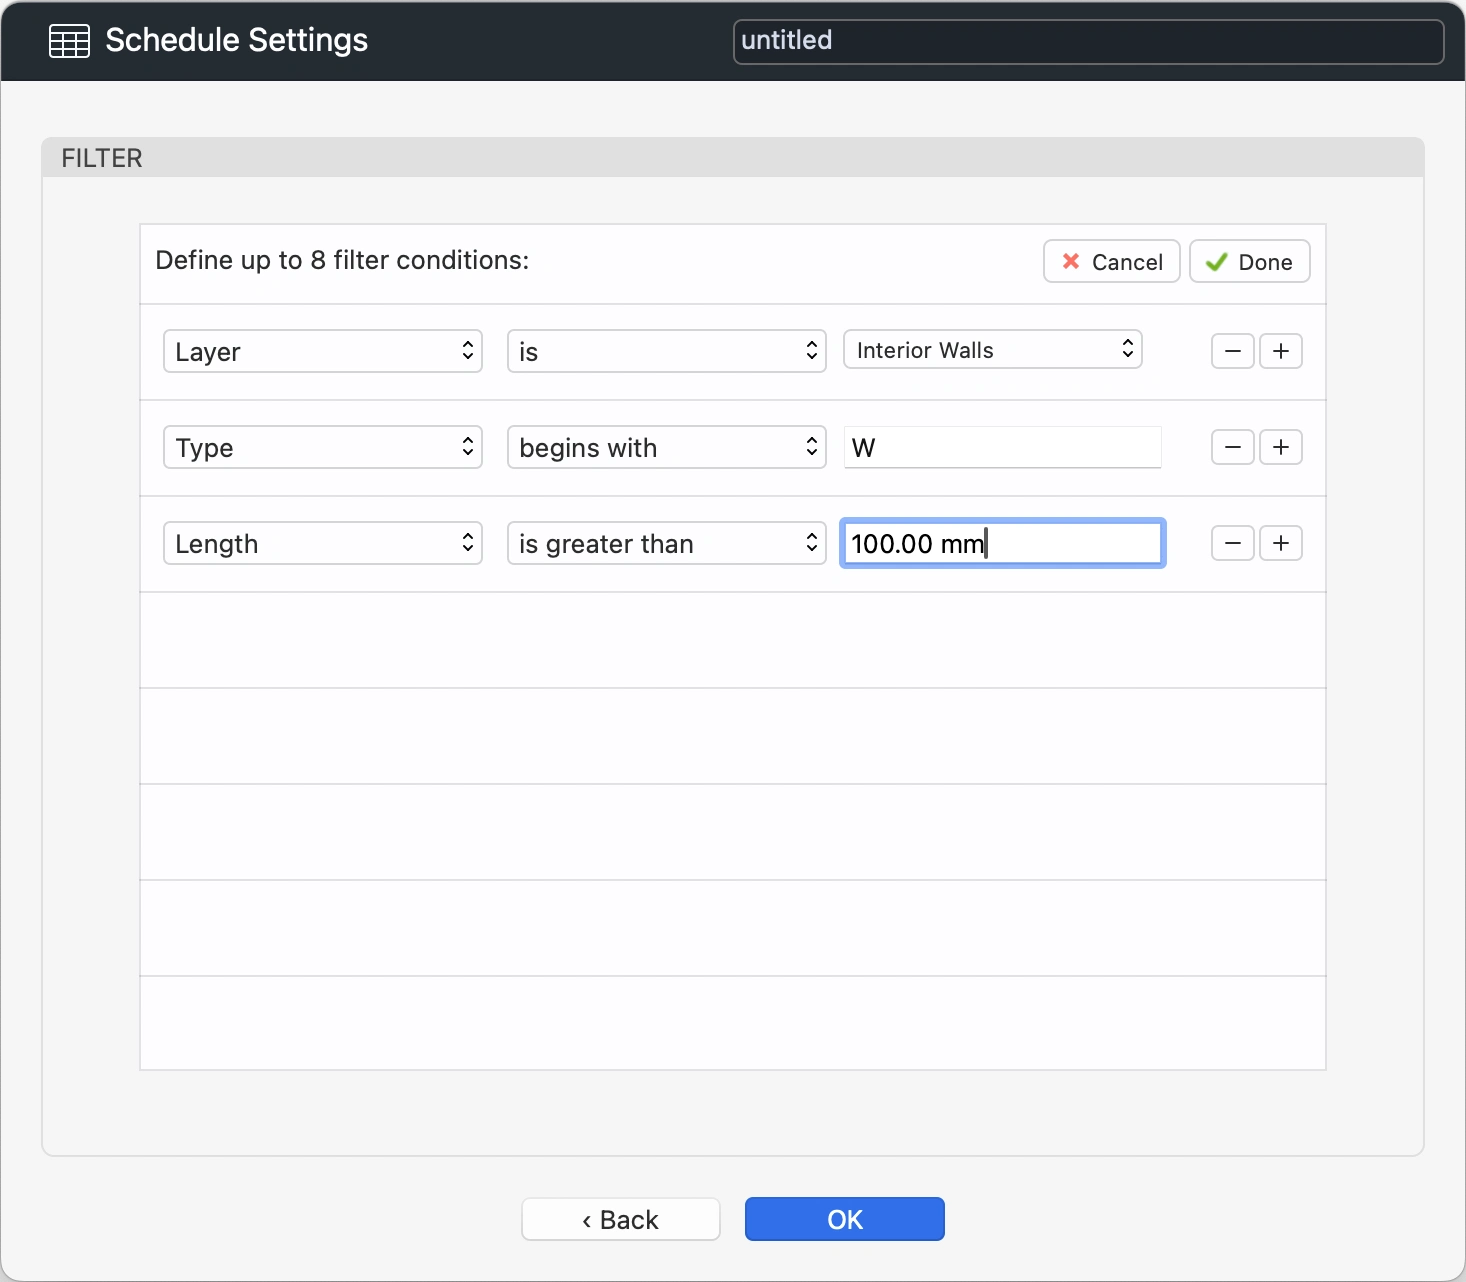
On the Filter panel of the Schedule Settings dialog, you can define rules that limit the number of listed items in a schedule.
To open the Filter panel, click the Filter button at the bottom of the Category list in the Schedule Settings dialog.
 _
_
You can define up to 8 filters, and all the criteria must be satisfied for the data to display.
A filter is structured as a sentence: the subject must meet a certain condition according to the logical rule specified. The subject is one of the available parameters of the current category, the condition is a number or text that you enter or a value selected from a list, and the rule defines a comparison between the subject and the condition, such as “begins with” or “is greater than”.
To define a filter, do the following:
To add a new rule, click the plus (+) button.
To remove a rule, click the minus (-) button. You can remove rules at any position.
To confirm the filters, click Done.
Create a Schedule
How to create a schedule in a project:
- Choose Project ‣ Schedules ‣ New ScheduleAlternatively, click the + button on the Schedules section of the Project Browser.
 _
_
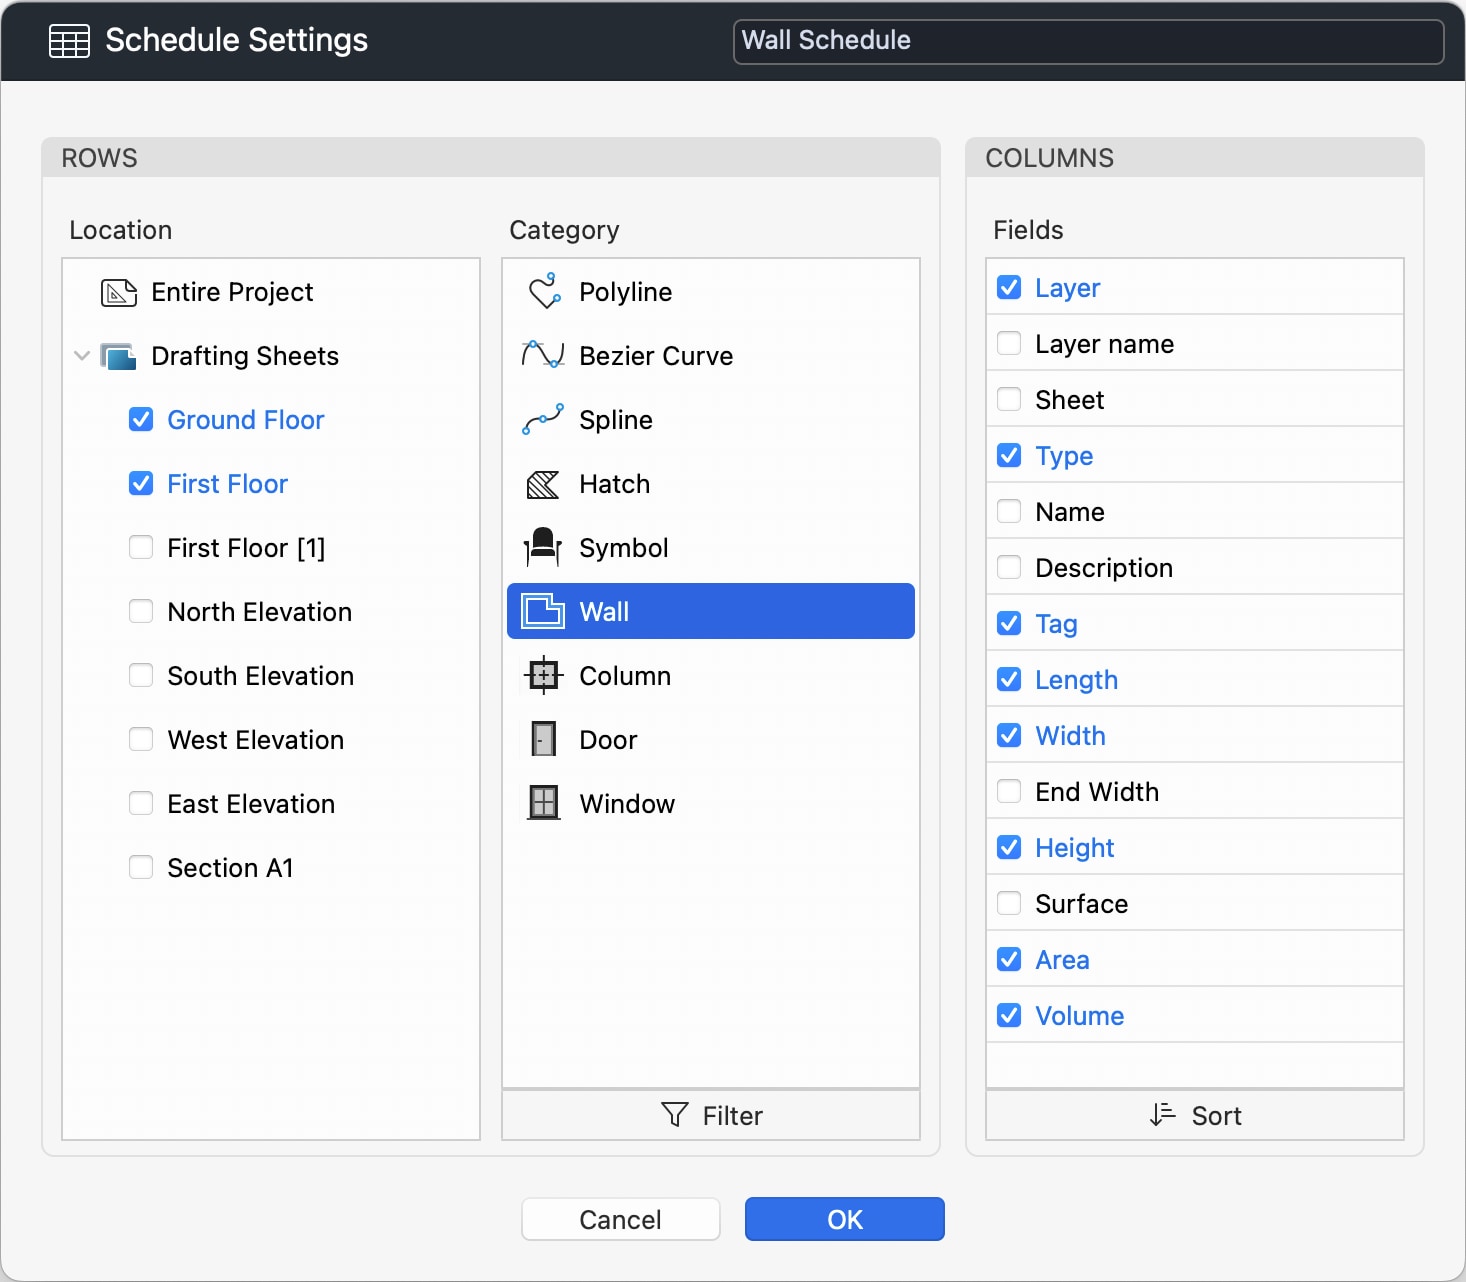
In the Schedule Settings dialog, you can enter a name and define the schema by selecting the category of items that will be listed in the rows of the table, and the fields to show in the columns.
To define the rows, do the following:
To define the columns, do the following:
Click OK to create the schedule.
Editing Schedule Elements
Schedules in HighDesign are interactive, in that each row of the table maintains a link to an actual element of the model so that values and calculations are always up to date. This connection works both ways: as you work on the model, the values on the schedule are updated, and you can also edit values directly on the schedule and see the changes in the model in real time. For example, you can change layer, type or length on the schedule and instantly see the modifications in the project.
Selecting an Element
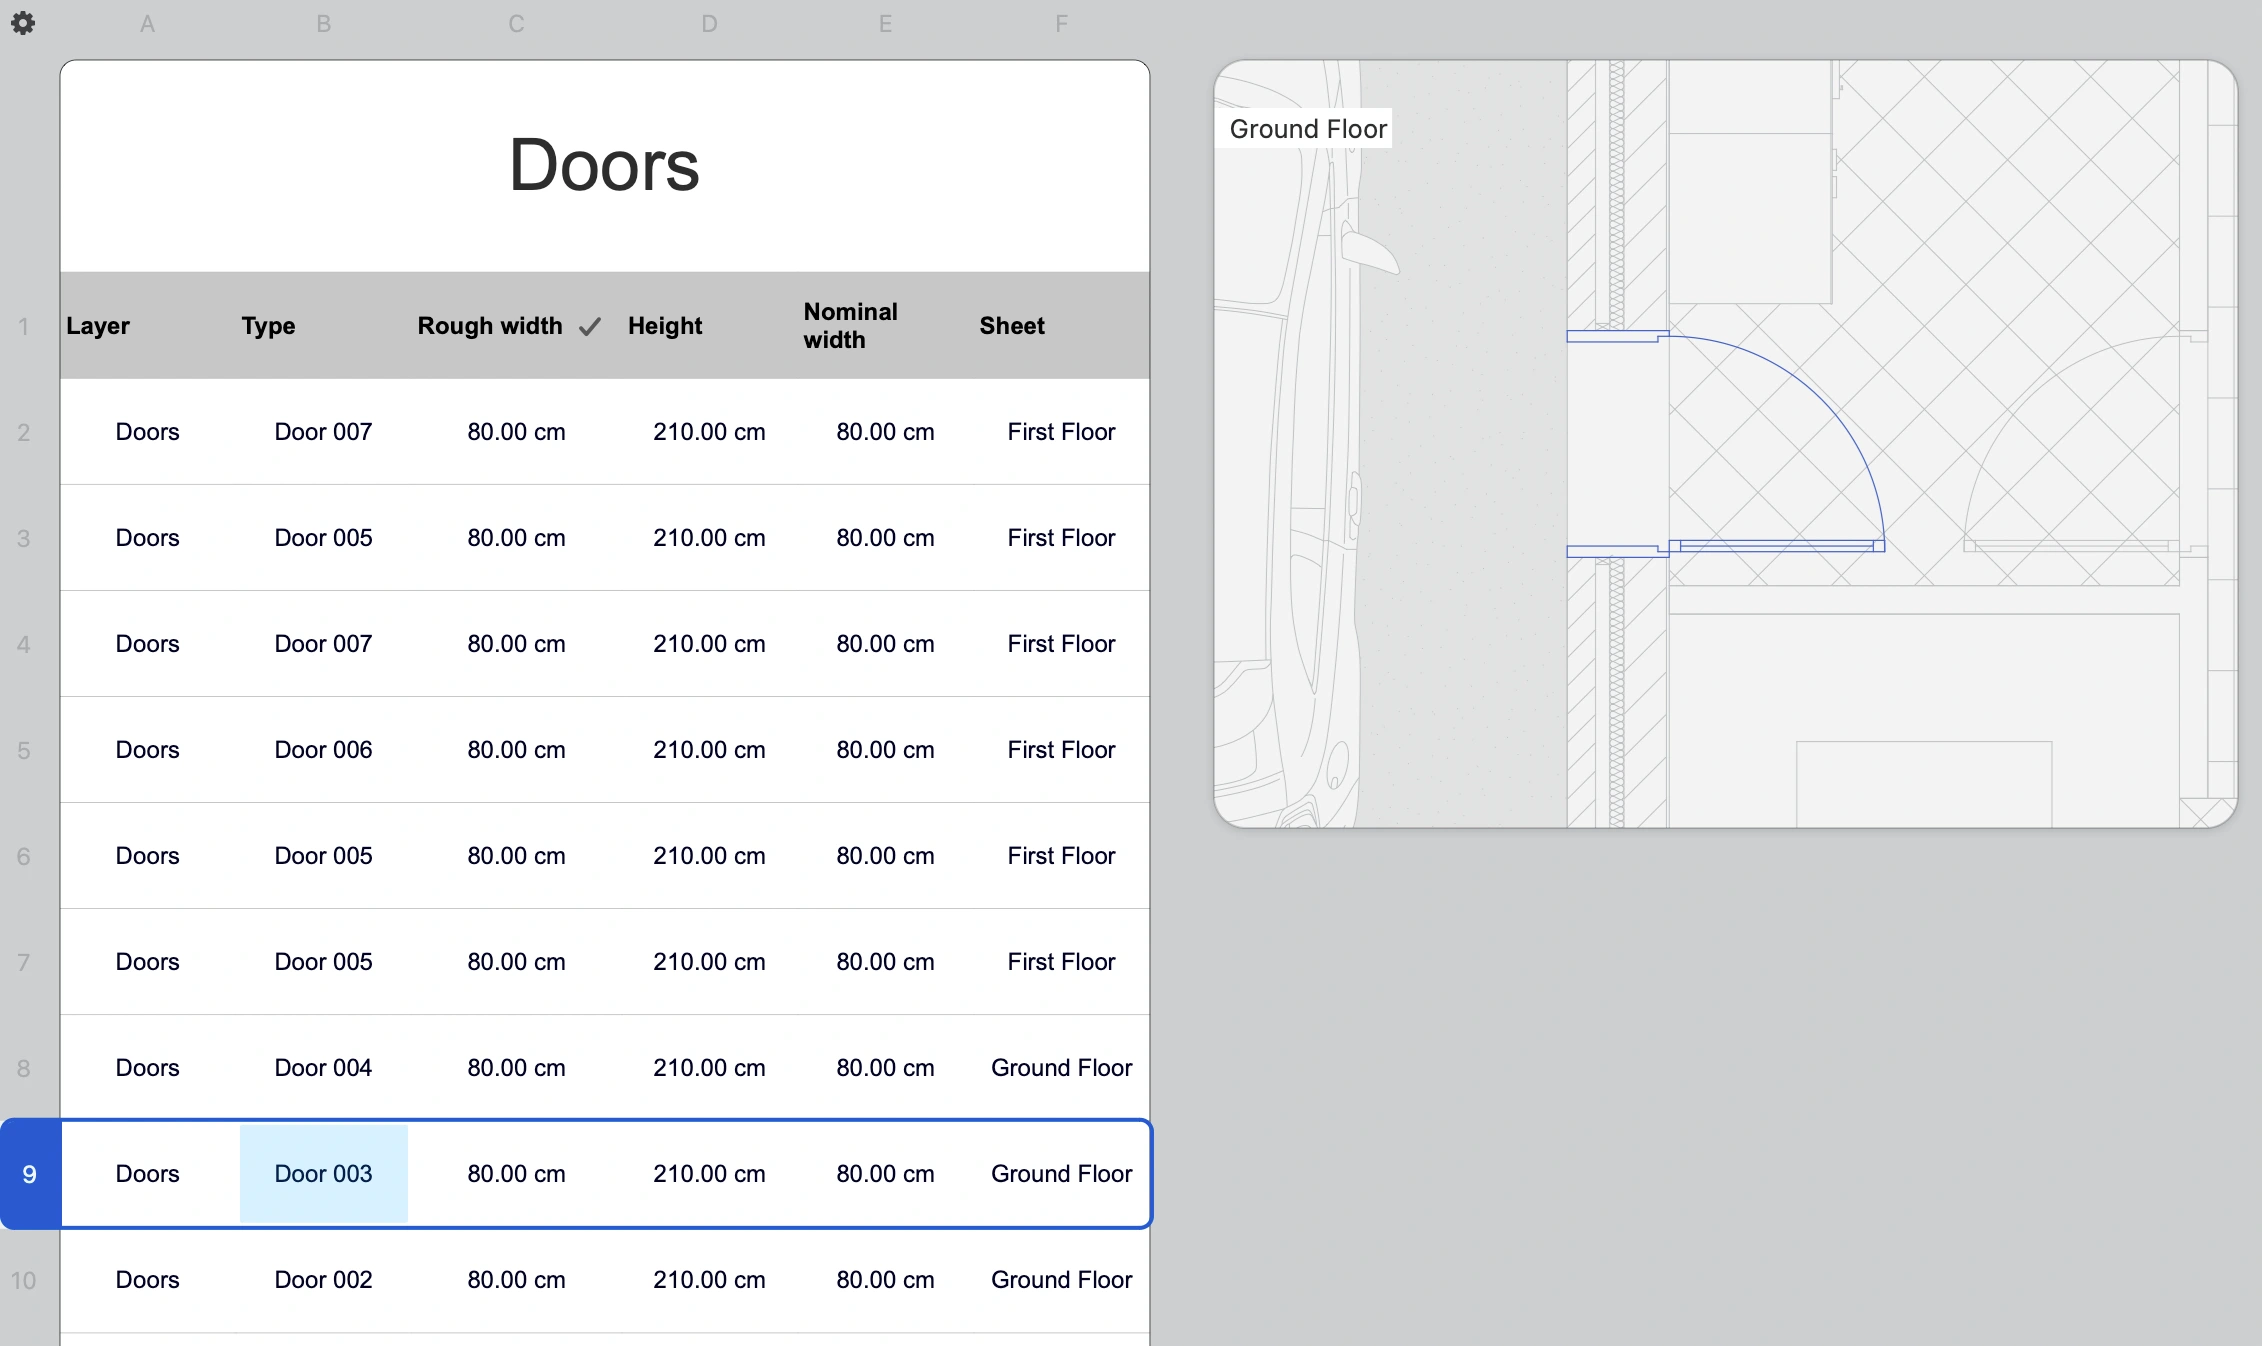
Click the row index to select the linked element on the schedule. A preview box on the right of the table shows the element in its context.
Double click the row index to go to the element’s sheet.
 _
_
Editing an Element
Editable fields in a row are marked with a solid border. Depending on the type of data, you can enter a value, such as a length or height, or choose an item from a list.
Values are entered in the units defined by the schedule sheet. You can change linear and angular units through the Object Info panel or the units popup on the Input bar of the main window.
Any change to an element’s values are applied immediately to the element.
Export a Schedule
Schedules can be exported as Microsoft Excel workbooks (.xlsx) or Comma-Separated-Values (.csv).
To export a schedule, do any of the following:
- Click the pop-up button on title row and choose Export.
- Push the Export floating button on the sheet.
Both file formats are widely supported by various desktop software and mobile or web apps. The conversion to the Excel format attempts to retain as much formatting settings as possible, and further formatting options can be defined in Excel or another software used to open the schedule.
The CSV format is a data-only format that retains no formatting, but is widely supported and easily readable and editable with any text editor.
Copy as CSV
When you select the entire schedule, choose Edit ‣ Copy to copy all the data as CSV text.
Formatting a Schedule
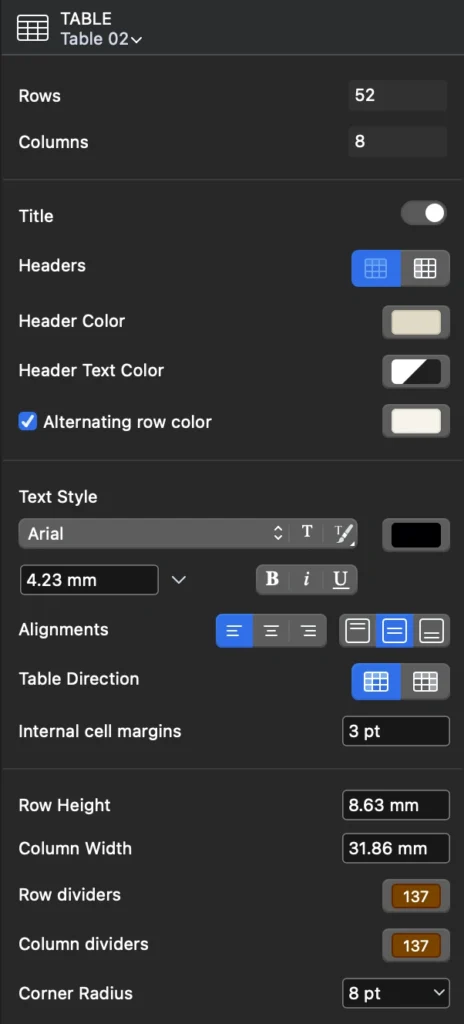
You can specify various options to format the schedule, including colors, fonts and sizes by using the Schedule Table Settings panel.
To open the Schedule Table Settings panel:
- Click the settings icon at the top-left corner of the sheet, between the horizontal and vertical headers.
- Alternatively, open the pop-up menu on the schedule title row and choose Table Settings.
Set a Style
As for other tool settings panels, you can click the title to open the Style chooser and change the style of the entire schedule. The styles are those available to the Table tool as there is no need to have a schedule-specific style. There are several predefined styles in the HighDesign library, and you can create and extend your own library of table styles.
 _
_
Not all parameters are available to schedules. The following fields and buttons are disabled:
- Rows and columns
- Title, always active
- Headers: the header row is always active. The header column can be enabled.
All other parameters can be modified. Text style parameters always affect to the entire table.
Show totals, sums, and count
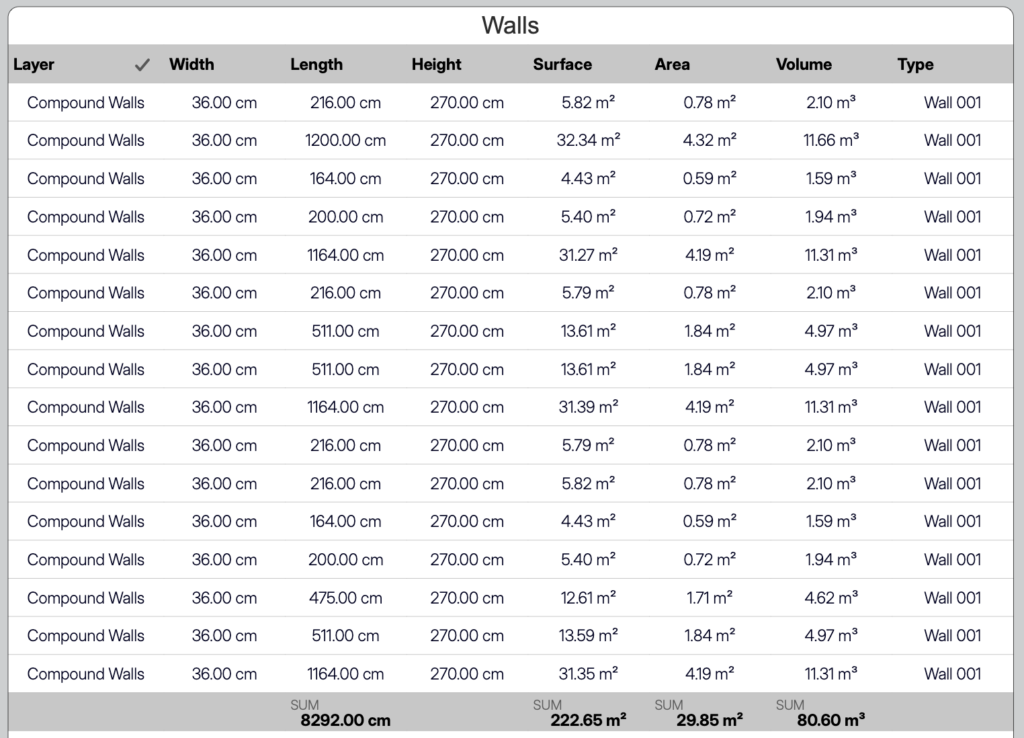
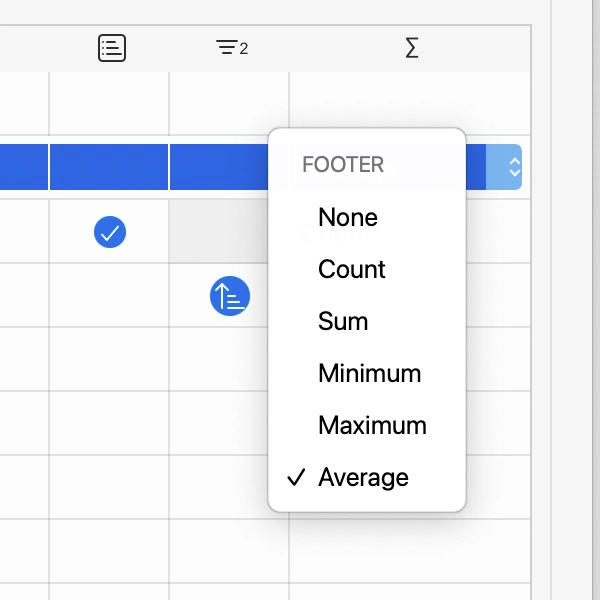
Schedules can display sums, totals and calculations. In the Sort panel, you can define what sums and calculations to display in the schedule by using the last column, marked by the Sum symbol.
Click the cell in the last column to define what calculation should be displayed. When you add a sum or total, a footer row is added at the bottom of each group or of the table if no grouping was defined.
Textual and object fields only allow the Count calculation, that is, the number of items. Numeric fields also allow sum, minimum and maximum, and average. These values are calculated in real time and are always up to date.
 _
_
Sorting and Grouping
Use the Sort panel to reorder the columns of the table, to define how the data should be grouped, and to specify what calculation to display in the footer row.
_
Reordering Fields
To reorder the fields, drag a row and move it up or down as desired. The letters refer to the columns as it is customary in all spreadsheet applications: the first column is A, the second B, and so on.
Primary Grouping
You can organize the data in the schedule in groups defined by a field. For example, in a Wall schedule you can group the listed walls by Type so that all the walls of the same type will be listed together. If you used four wall types in your project, the schedule will display four groups.
To select which field defines the primary grouping, click its cell in the second column. The check-mark indicates the current primary grouping field.
Only one primary grouping field can be selected.
Sorting
 _
_
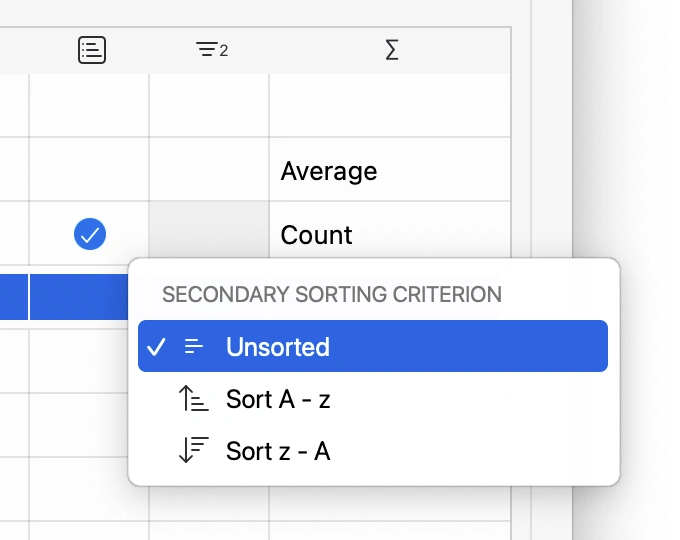
The items in the group can be further organized by selecting a sorting criterion.
You can sort the items from first to last, last to first, or leave them unsorted. In this latter case, the items are listed in the order in which they are in the project.
The Schedule Sheet
Once you create a new schedule, it is placed on a new schedule sheet that is listed on the Project Browser in the Schedules group. The schedule sheet and table provide various options for the quick formatting and editing of the schedule.
On the schedule sheet, you can modify the table structure to resize columns, rows and specify various formatting options for a schedule, such as colors, fonts and sizes.
The schedule sheet also includes two floating buttons to open the Schedule Settings window and to export the schedule as CSV or Excel.
Table Structure
The schedule sheet always shows the horizontal and vertical table headers on the top and left sides of the sheet. These special headers show the structure of the table and the identifiers of the columns (A, B, C…) and rows (1, 2, 3…). Use these headers to select a row or column or to resize them.
Select a Row or Column
Click on the heading to select the entire row or column.
Select All the Table
Choose Edit ▸ Select All to select all the data of the table.
Resize a Row or Column
- Move the pointer over the separator to the right of the column or below the row. The cursor changes to show that a resize action is available.
- Click to initiate the resize action.
- Move to enlarge or reduce the item. Rows and columns can only be resized within certain ranges, from a minimum to a maximum size.
The Schedule Table
The schedule table is the table that displays the actual data of the schedule. This is a special table that provides options that are specific to schedules.
Title Row
A schedule table always shows the title row, it cannot be omitted. Double-click the title row to change the schedule name.
On the right end of the title row, a pop-up button provides access to the Schedule Options menu. Move the pointer over the title row to reveal it and click the button to open the menu. The available options are:
- Settings
- Filters
- Sort
- Export
_
Header
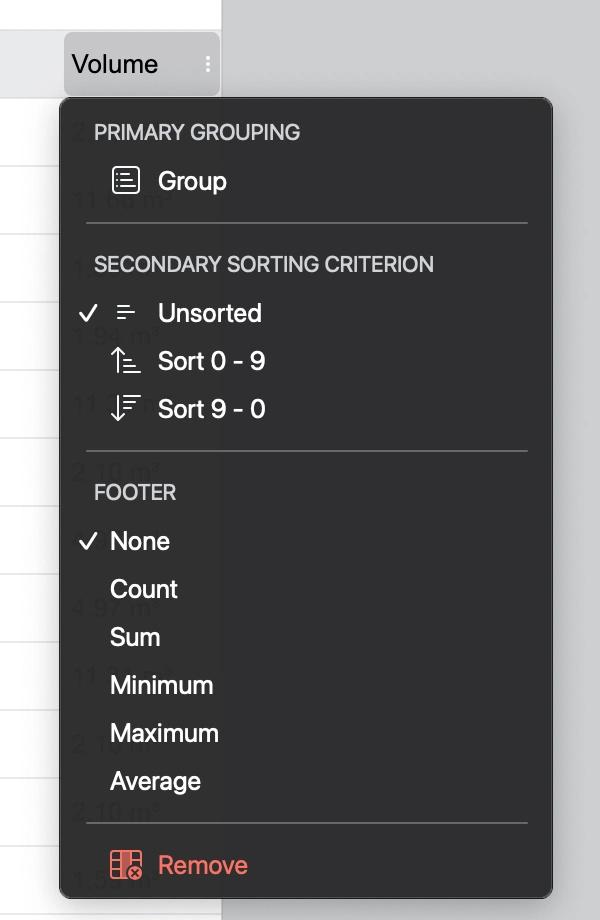
The horizontal header displays the fields in their order and is always visible. The field that controls the primary grouping is marked with a check-mark.
At any time you can click a field to open the Grouping, Sorting and Totals menu. Use this menu to:
- Change the sorting options and define a different primary grouping field.
- Change the sorting order.
- Enable or disable a footer field with totals and calculations.
- Remove the row from the schedule.
 _
_