Subsections of Tables
About Tables
Tables contain information and data about the design in rows and columns, and complement the model and the drawings as a documentation functionality. You can insert data directly or import a worksheet from a spreadsheet software, format the data customizing colors, fonts and sizes, and add formulas that perform calculations of sets of cells.
 _
_
Topics in this Section
- Table Tool Settings
- Create a Table
- Import a Worksheet
- Formatting a Table
- Add Functions to a Table
Add Functions to a Table
Table cells can also display text that is the result of a function. To add a function, select a cell and press the Function button on the Table toolbar.
HighDesign includes the following functions:
- Sum
- Product
- Average
- Maximum
- Minimum
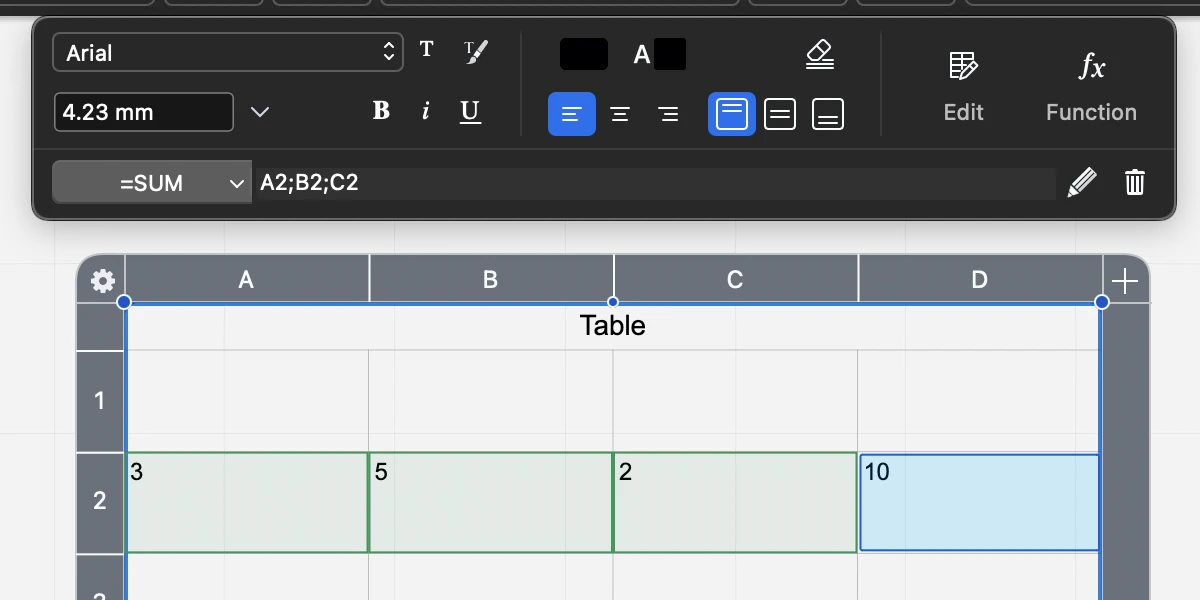
After pressing the Function menu, the toolbar expands to show the Function field and controls. Use the pop-up menu to select a function.
To define the cells that provide the data for the function, click on them or enter their coordinates in the field. Press the checkmark button to confirm the selection.
To edit a function, select it and click the Edit or Pencil button on the toolbar.
To remove a function, select it and click the Delete button on the toolbar.
Create a Table
To create a table:
- Activate the Table tool.
- Click to specify the insertion point.
- Move the pointer and click again to define width and height of the table.
The table is created with the default number of rows and columns as set in the Table Settings panel. The width of columns and the height of rows are calculated from the table width and height.
To select a cell, select the table object, then:
- Click on a cell to select it
- Shift-click on a second cell to select all the cells from the first selected to the second selected.
- Cmd-Click (Mac) or Ctrl-Click (Win) to select a cell without deselecting the others.
- Press the up, right, bottom and left arrow keys on the keyboard to move the selection to the nearest cell in that direction.
- Press the Tab key or Shift-Tab to move the selection to the next or previous cell. When the cell text was edited, the Tab key also confirms the input.
- Press the Return key to edit the selected cell.
- Press the Esc key to cancel the current input, or deselect the cells.
To enter data in the table:
- Select the table.
- Click on a cell to select it and enter the text.
- Press Enter to confirm the text, or Tab to move the focus to the next cell.
You can also double-click a cell to open the input area directly.
Format Table Cells
When you select one or more cells in a table, the Table Formatting toolbar opens on the top side of the drawing area.

Use this toolbar to
- Set the font, size and style of the selected cells. These settings override the default parameters of the table.
- Set the cell background and text colors.
- Change the horizontal and vertical alignment of the text inside the cell.
- Clear all formatting of the selected cells and revert them to the table defaults.
- Edit the table to insert and remove rows and columns, fit row heights and merge or split the selected cells.
- Insert and modify functions and formulas.
Edit the Table Cells
Click the Edit button on the Table toolbar to open the Edit menu. This menu provides the following functions:
- Insert Row Above/Below: adds an empty row above the first selected cell or below the last selected cell.
- Insert Column Left/Right: adds an empty column to the left of the first selected cell or to the right of the last selected cell.
- Delete Row/Column: removes the row or column of the selected cells.
- Fit Row Height: resizes the row to fit the largest text in all columns.
- Merge Cells: when the table contains two or more selected cell, this command merges the cells from the first to the last cell. The selected cells don’t have to be contiguous. Note that the Merge command only displays the content of the first cell and hides any data that might be in the other cells.
- Split Cells: apply this command to a merged cell to restore the original rows and columns. This command also restores the original data of the other cells.
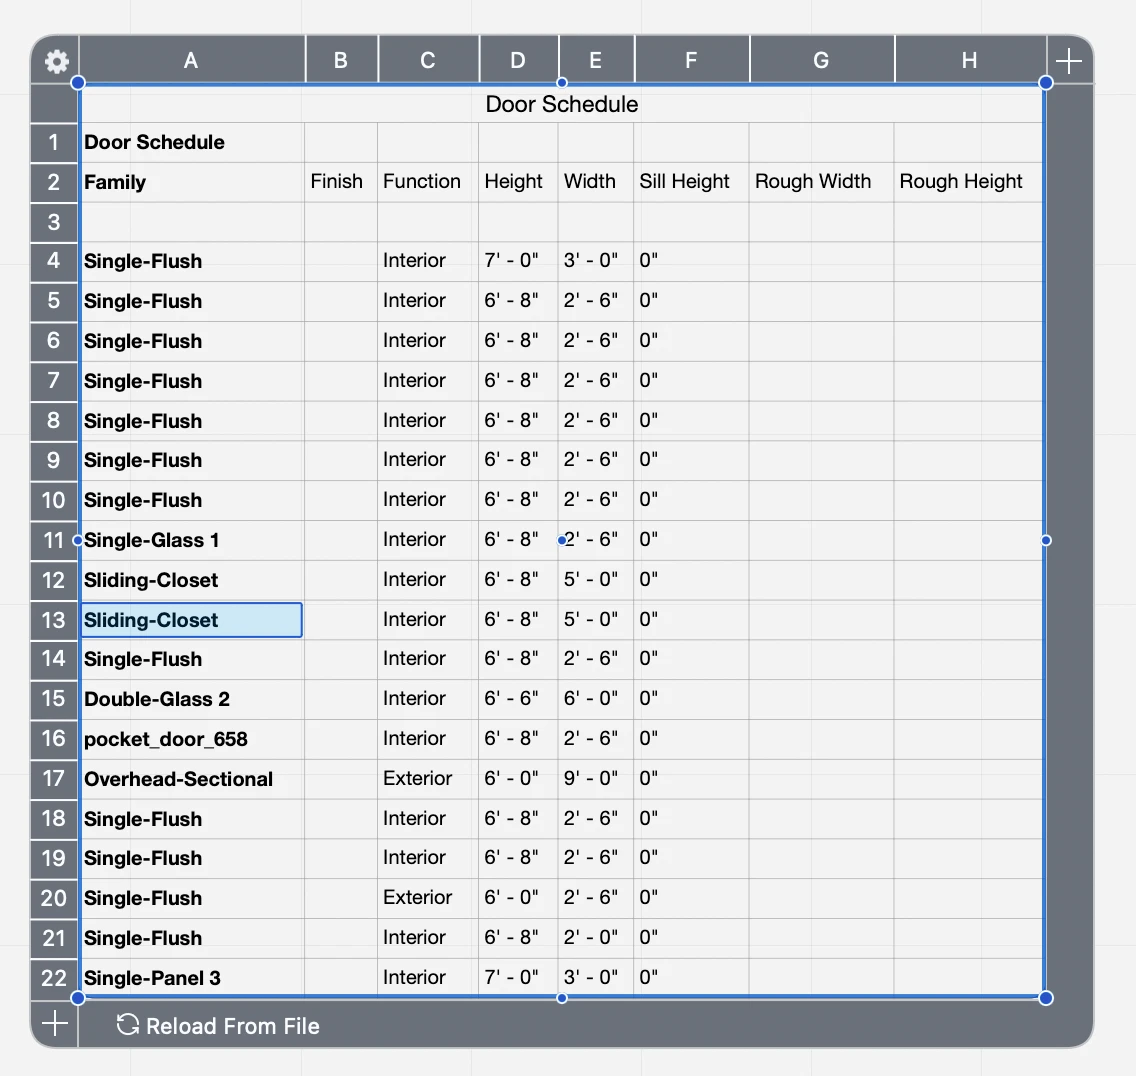
Import a Worksheet
You can import data from another software using the XLSX (Excel worksheet) and .CSV (Comma-Separated-Values).
Insert a Worksheet
- To import data from a worksheet, choose Project ‣ Insert ‣ Table.
- The data will be converted to a HighDesign table. Click on the drawing area to insert it.
The Excel (.xlsx) file format retains formatting and sizes, while CSV is a data-only format. In the latter case, HighDesign creates a table using the current default parameters for row height, column width and text style. Once inserted, the table can be edited and formatted as needed.
 _
_
Data Link
The inserted table keeps a link to the original file whenever possible. That means that you can update the contents of the table in HighDesign at any time when the original file is being edited in another software.
To update the data in a table, select it and press the Reload From File button.
Reloading the data updates the content of the table and adds rows and columns as required by the data, but does not change the current formatting style of the table.
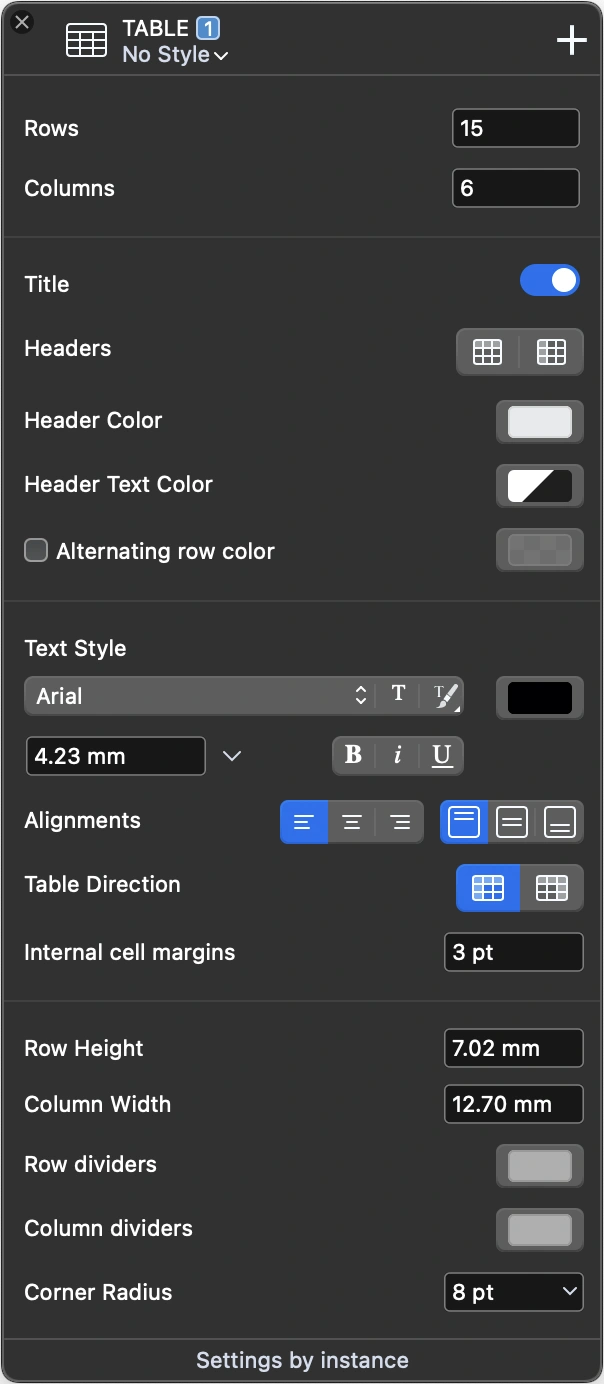
Table Tool Settings
Use the Table tool settings panel to specify the default parameters for new tables or modify a selected table.
The panel includes sections to let you define the number of rows and columns, title and headers, font and text sizes, and row and column sizes.
 _
_
Define Rows and Columns
Use the Rows and Columns fields to define the number of rows and columns in a table. Please note that reducing the number of rows or columns will also discard any content in those cells.
As you increase the number of rows or columns, the table adds the item to the bottom or right and copies its size from the previous row or column in the table.
Title, Headers, Alternating Rows
Activate the Title switch to add a title to the table. The actual title and its formatting can be edited directly on the table like any other cell.
A table can have both a horizontal header for the columns and a vertical header for the rows. When the headers are enabled, the first row after the title and the first column will be displayed as headers.
Use the buttons in this section to specify background and text colors for the headers.
You can also choose to display the data rows with a custom, alternating background color. Activate the Alternating row option to enable this feature. The first row background color is that defined as table background color in the Properties bar or Graphic Attributes panel.
Text Style
Use this section to specify the default font, size, color and style of the entire table, with the exclusion of the title row.
The Alignments buttons let you specify the default horizontal and vertical alignments of the text inside the cell.
You can also change the horizontal direction of the table, left-to-right or right-to-left according to your regional settings.
Use the margins field to change the internal margin of the cell, which is the distance from the cell border to the text.
Row, Column and Border Options
Use this section of the panel to customize the default row height and column width, and change the colors of the horizontal and vertical separators. To hide the separator lines, set the No Color option on the Color pop-up window.
Tables can have a border whose color is defined through the Properties bar or Graphic Attributes panel. To hide the border of a table, set its color to “No Color”.
Table borders can be rounded: use the Corner Radius field to specify a rounding value.