Subsections of Working with DXF:DWG Drawings
Export a DXF/DWG Drawing
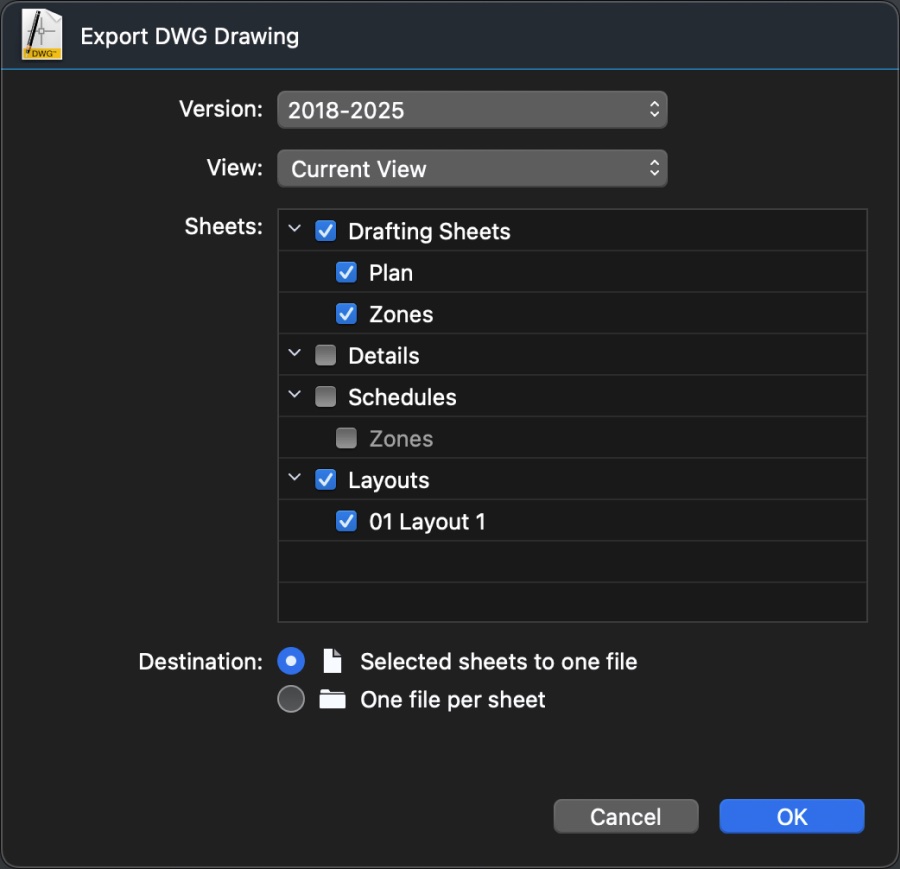
To export a drawing as DWG or DXF, select File ▸ Export ▸ DWG or DXF. A dialog allows you to define the parameters for the conversion.
The Export as DWG/DXF dialog
- Format version via a pop-up menu. This menu lists all the supported DWG/DXF versions from R12 to the latest 2018-2025.
- View: open this menu to select a view to export. The available options are:
- Current view: exports the drawing that is currently actve and visible on screen.
- All Sheets: exports all the sheets in the project.
- All visible sheets: exports only the sheets that are visible.
- Custom set: use the table to select what items you want to export.
- Project Views: if the project contains named views, you can select one from the list.
- Sheets table: a list of the sheets in the projece. You can select Drafting Sheets, Details, Schedules and Layouts;
- Destination: you can choose the export the drawings as one file or as separate files.
- Option to export all selected sheets as a single DWG/DXF document;
- Option to export each selected sheet as a separate document (all documents are collected in one folder).
Important
CAD programs that use DWG/DXF as their native file format have a different system of arranging drawings and layouts compared to BIM-oriented programs like HighDesign. In those kinds of software, the project is usually contained in one virtual space called Model, scaled at 1:1. The various drawings are usually placed one next to the other, tiled on an infinite drawing board.
HighDesign on the other hand uses sheets to organize the project, which means that each drawing as its own, independent space. When exported as DWG/DXF, a HighDesign project may show some drawings overlapped in the Model space.
To avoid that, you may want place your drawings so that they do not overlap, by using the sheet’s visibility options, or you can export each drawing to a separate file by selecting the “One file per sheet” option.
For best conversion to DWG/DXF, set the drawing units of your drawing to either decimal inches or millimeters.
Import a DXF/DWG Drawing
Select File ▸ Import ▸ Single DXF/DWG file. Before opening a DXF/DWG file a dialog lets you set the basic import settings:
- Drawing units to be used to convert DXF/DWG elements; most DXF/DWG versions do not include a measurement unit;
- Destination scale of the drawing;
- When the “Use file drawings units” option is active, HighDesign tries to set the drawing units as found in the file. If no drawing unit is found this option has no effect;
- Options to set the background color to black or to add a prefix to layers;
HighDesign SE and Pro import DWG/DXF documents with both Layouts and Model data: when opening the document, the drawing, or Model, is located on the sheet named “Model”. In HighDesign SE, layout sheets are imported as drafting sheets with a defined paper format; in HighDesign Pro, the Layout objects are imported into layout sheets.
HighDesign LT only imports the Model space. Layouts are ignored.
Insert a DWG/DXF drawing (SE & Pro)
In HighDesign SE and Pro, use the Project ▸ Insert ▸ DWG/DXF drawing menu item to insert a DWG/DXF drawing into the current project without creating a new document. This command will add a new drafting sheet with the Model space from the specified drawing.
Extend the default Symbol Library
It is possible to extend your Symbols library by creating new custom symbols or by adding external libraries: the “Add Symbol Library” command on the File menu lets you select a folder of HighDesign symbols and copy them to the desired folder in the User Library folder.
Import and Extract Blocks
Use the “Import DWG/DXF Blocks” tool to convert a folder of DXF/DWG blocks or drawings to HighDesign-native symbols. Converting a symbol library is a two-step process, all performed in a single window.
Choose File ▸ Import ▸ Import DWG/DXF Blocks…; the following window opens:
- Conversion options - convert blocks/drawings within one folder or blocks within one DWG/DXF file. Push the Choose button
- When the import process is complete, you can use the table to review and edit the imported symbols.
- Preview of the symbol.
- Click the Convert button to save the HighDesign symbols into your current Library folder.
The list of symbols can be reordered by dragging the rows.
The first step consists of selecting the folder on your disk and importing all the readable drawings contained in it. Supported formats are all DXF versions from R10 to 2020 and all DWG versions from R9 to 2020.
Push the Import button to choose the folder. If the selected folder contains readable files, the standard DXF/DWG Import dialog opens allowing you to set the scale and drawing unit options.
With the second step you can set the options and complete the conversion to HighDesign symbols. The table displays name, scale, width, height and the preview of each symbol, letting you modify the attributes of the symbol before it is saved.
